| |
|
|
|
|
|
|
----------------------------------------------------------------------------
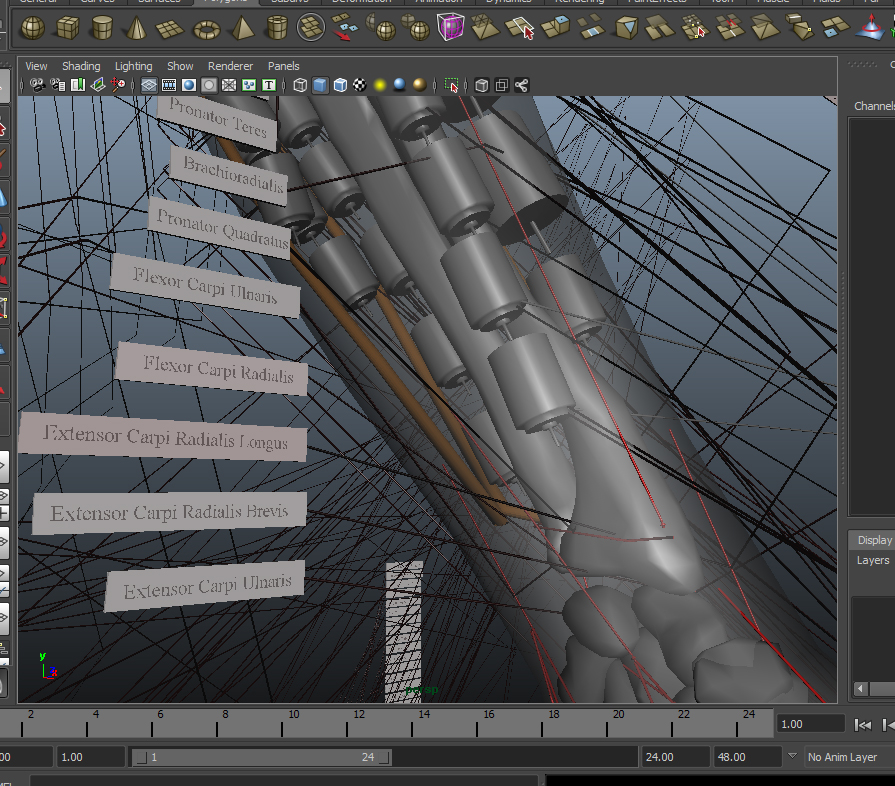
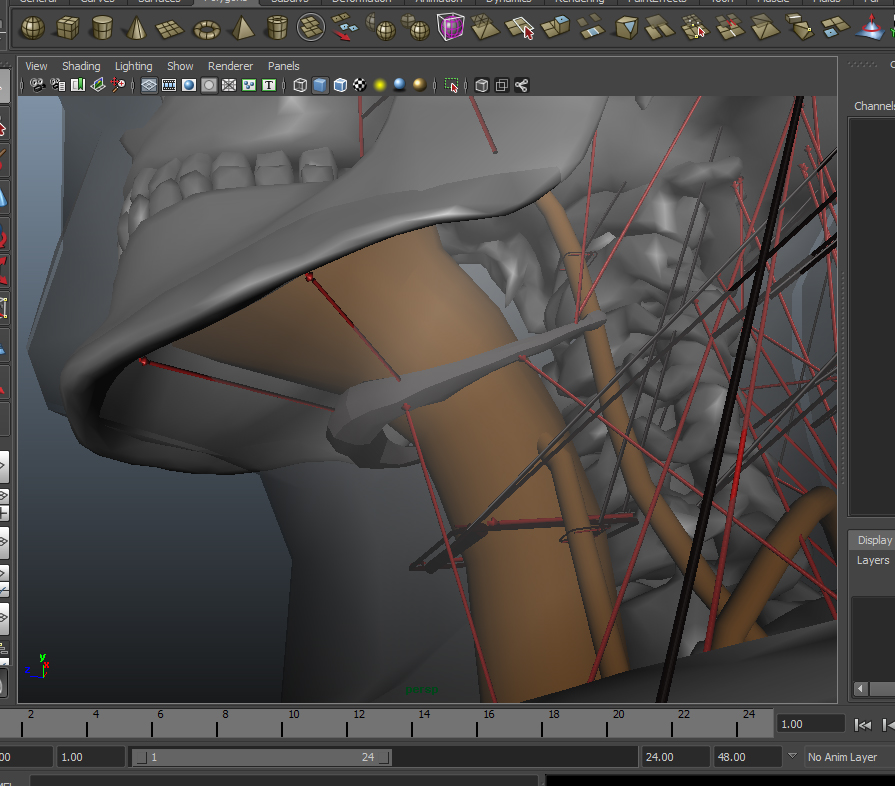
Blog Post #10, submitted 6/11/24 Note: The decision to use a human-like skeletal system has to do with wanting to benefit from the amazing design God gave the bones and muscles of the human body. They are very well engineered and when you study anatomy, you come to really appreciate the genius of the designs of the musculoskeletal system. It is very efficient, powerful, and robust. The notion that it can be improved upon is one I disagree with. Also, by using the same musculoskeletal system we have, I can study my own movement to understand the challenges in balance and inverse kinematics and whatnot I will face when tackling those things for the robot. In addition, the robot itself will have AI that will mimic and emulate how humans move in order to learn new skills and this will be doable largely because the robot will move the same way humans move, owing to the fact it will have the same musculoskeletal structures. Also, suppose one could make the argument a third arm would be a improvement on the human body. Well if you do this, it will look unnatural and deformed and cause a disgust reaction in people seeing that gruesome third arm randomly there. I'd rather it look beautiful and natural rather than grotesque and odd. And supposing I did add that third arm, now the robot's AI has to figure out what to do with that third arm at all times and modify its gate and stance and movements to accommodate it and can no longer faithfully emulate human movement quite the same as it has to account for the weight and momentum of this third unnatural appendage. So really you would just be adding unnecessary complications at that point. Better to just go with a normal human build. Also, I have a goal to have the robot pass for human to a casual observer at least from a moderate distance. I'd like it to be capable of grocery shopping without anybody knowing it was a robot. Or it would be cool to have it approach people in public and strike up a conversation with strangers and see how long it takes the stranger to realize it is a robot. I would find that very amusing. That would make for some excellent YouTube content IMO. So after switching to focus on the Abel robot, I was able to entirely dedicate myself to figuring out the electronics challenges because my structural frame was done quickly. I began to wrap my head around the vastness of the complexity and total parts needed for this and determined that just randomly placing parts won't work. So many parts in so small of a place would require extensive planning to ensure it all fits and lots of arranging work would be needed to make it all fit. So I first obtained a free 3d scan of a skeleton and I lowered its polygon count with the zbrush decimate tool to a more workable level and then I customized said skeleton to match the dimensions of my PVC medical skeleton perfectly. So now I had a model in CAD to scale. I did all of this in Maya. Then I did a 3d base mesh sculpt of the outer form of the robot overlaid onto the skeleton to scale to define the space I was constrained to for my electronics parts placement. I then made a red cylinder arrow indicator in CAD indicating the travel path of each pertinent and necessary muscle of the human body which showed where my muscle cable routing would have to go. I then researched every brushless direct current motor on eBay and made a list of their specifications in a database and assigned an appropriate motor to each muscle one by one that I made in the CAD file with the red arrows. I drew in CAD a black arrow pointing to the red arrow and to a 3D model I made of each motor to scale with the motor I assigned to operate each muscle from my database of motors. This way I assigned a motor to every muscle of the body. I next created a black arrow pointing to the red arrow and pointing to a placard on which I put the name of the muscle in question for future reference. Once all the motors were assigned and placed in CAD, I dragged and dropped these motor models into specific locations within the base mesh of the body wherever I was able to find room for them. I tried to centralize the weight distribution to match the weight distribution of the human body. Most weight being centered around the core. Weight more distally located would make limb movement more sluggish and difficult so more central locations for the heaviest weight things is ideal. I then modeled my artificial lungs and artificial heart cooling systems and reservoirs and pumps and tubing routing for the cooling. I had most of this stuff already designed on paper sketches but putting it all into a 3D CAD model really helped visualize and solidify my designs and add more detail to it. I then modeled 18650 lithium batteries in color black and placed them in the abdomen region. (It will use a hot swappable battery backpack to supplement these as well). The only muscles of the body I did not do in my CAD is the facial ones but I figured I can worry about that later and that part should be very straightforward and is not necessary for full functionality of the robot and is more just for aesthetics as a icing on the cake late stage development. Those motors I think can all fit into the skull so as long as I keep that empty, I'll be good to go when the time comes to get into facial animation but that is not a high priority for me. That is a solved problem in robotics anyways but human level strength and speed in a realistic human looking body is not a solved problem so that is my main focus. Here's pictures of my CAD work for the above described stuff: 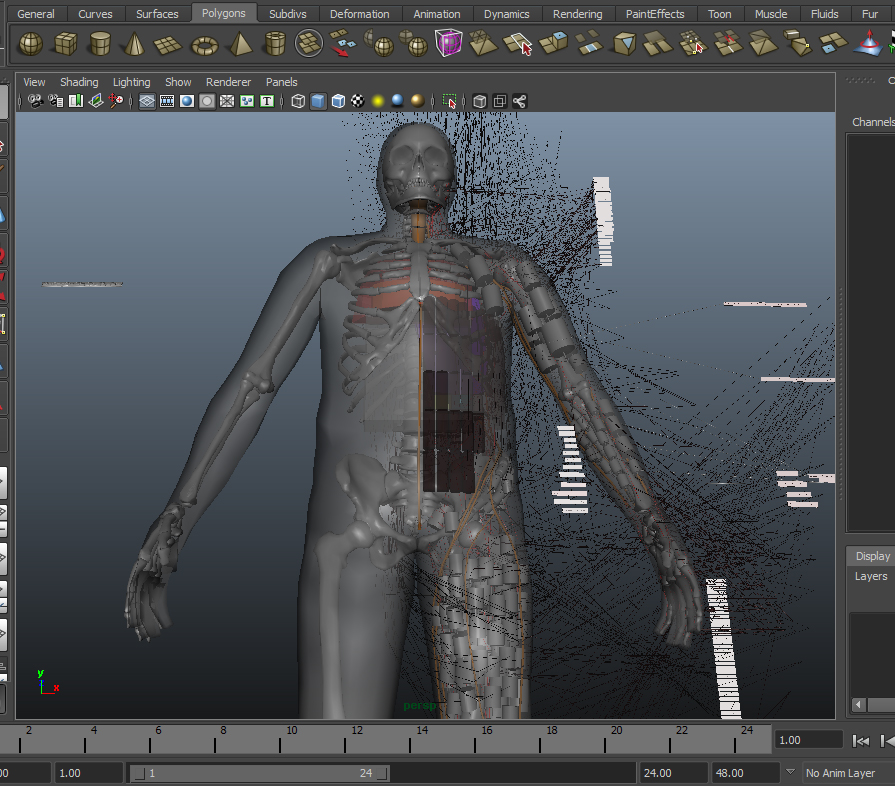


Drop a Comment: Comments: ---------------------------------------------------------------------------- Blog Post #9, submitted 6/11/24 I then moved onto the ribcage and spine sculpt: 
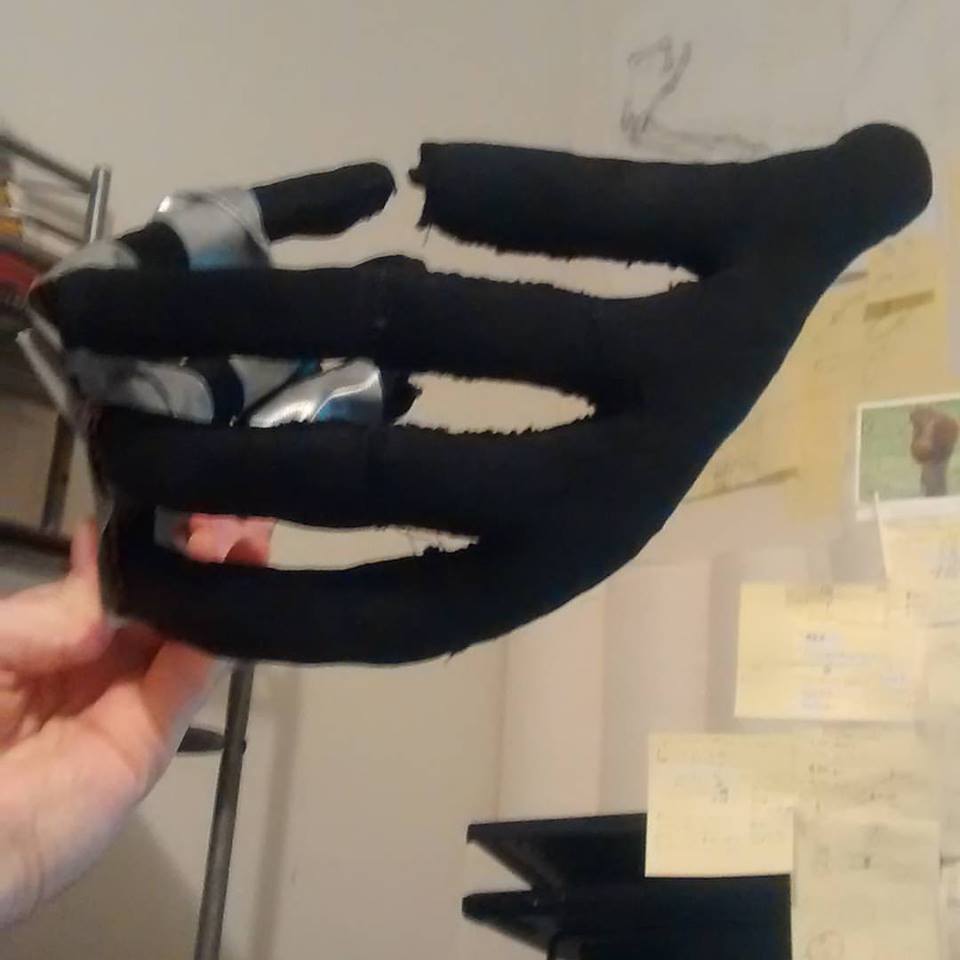
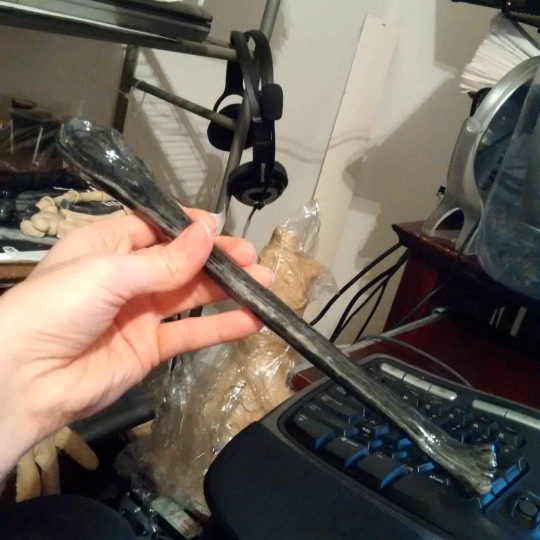
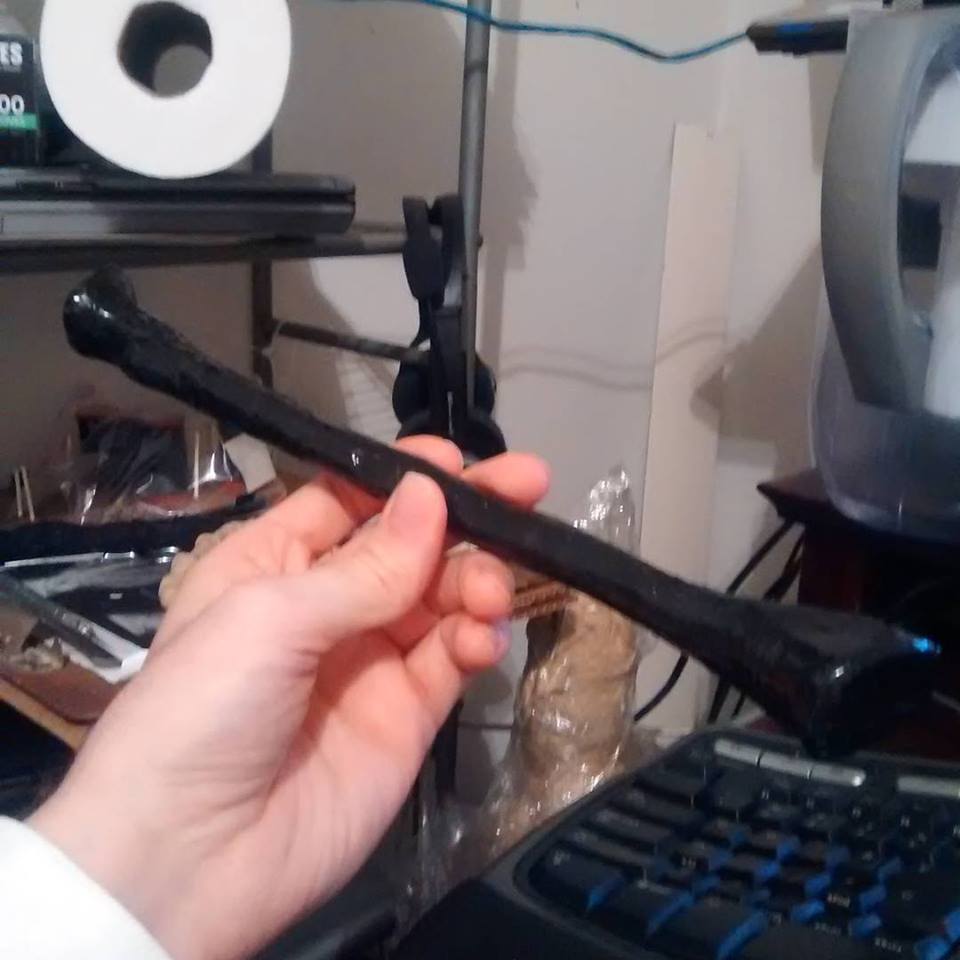
I managed to attach about 60% of the ribcage and spine together with the spandex ligaments and still had several ribs and vertebrae to go when life happened and I set aside this project for some years besides some rare spurts of progress. But then picked the project back up in earnest a few years later with the PVC medical skeleton idea which ushered in the Abel robot to get things rolling more quickly with a completed skeleton to start with as a base. This would save tons of work and get me back on track timeline wise for my goals. Note that even while making the fiberglass skeleton, I had people ask why not just use a pvc skeleton, and I'd tell them some reasons I had at the time. However, I was unaware then that PVC medical skeletons can be VERY strong, solid cored, not terribly heavy, and very high quality for robotic bones and are super cheap. When on sale, they can be as low as $80 and free shipping but often climb up to the $120-130 range with free shipping off ebay or amazon. That is very doable and saves COUNTLESS hours of trying to hand fabricate every bone one at a time. That was brutal and probably had a small role to play in burnout for me. When a project feels endless, it is easy to get distracted by grass is greener other things and just stop working on it. But I want to really stay consistent with progress going forward on this. I have made it my #1 highest priority project now and even created a commitment to always work on it EVERY DAY even if its just a single small thing. That steady progress adds up and makes the whole thing a lot more exciting and the momentum keeps it moving. I have managed to do this for 3 months with very few exceptions so it is working great so far. Probably one big issue I had at the time and still have is that if you go with a PVC medical skeleton you are stuck with whatever height they sell and usually they are like 511" - which is not bad for most cases, but in my case I wanted Adam to be my height so wanted to make the bones custom. Plus, hollow fiberglass bones are lighter. But the added weight of solid PVC bones is not prohibitive imo. Still very doable. Drop a Comment: Comments: ---------------------------------------------------------------------------- Blog Post #8, submitted 6/9/24 Here is the completed bone cloth enclosure adding phase of the robot hand and arm: 
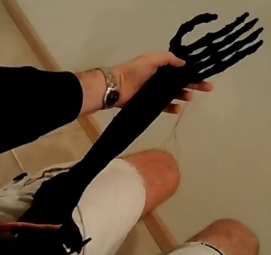
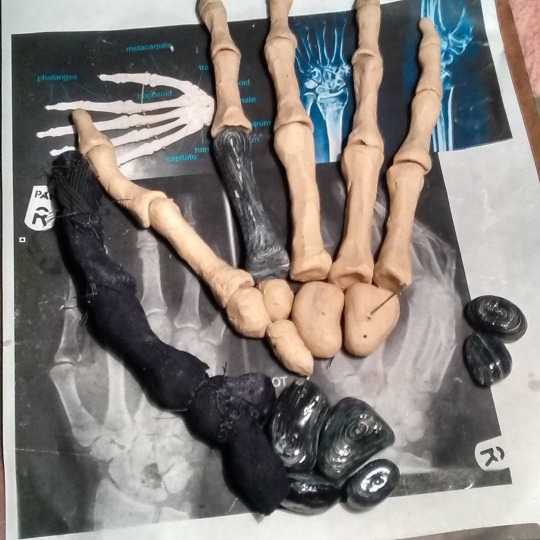
Drop a Comment: Comments: ---------------------------------------------------------------------------- Blog Post #7, submitted 6/8/24 Here's the robot hand starting to take shape: 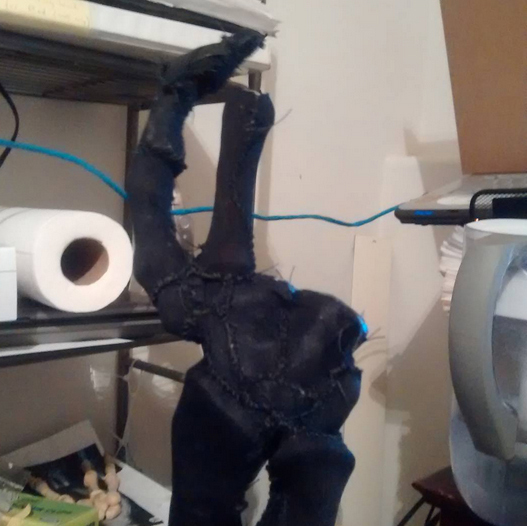
Also, here is some attempts at a flexible mesh exoskeleton I did for the hand. These were failures though because I did not realize you have to be able to deform this while it retains its shape integrity so it needs a lot of consideration for how it deforms in order to match the appearance at the locations of joints of a natural joint deformation that occurs when a joint bends on a human body. 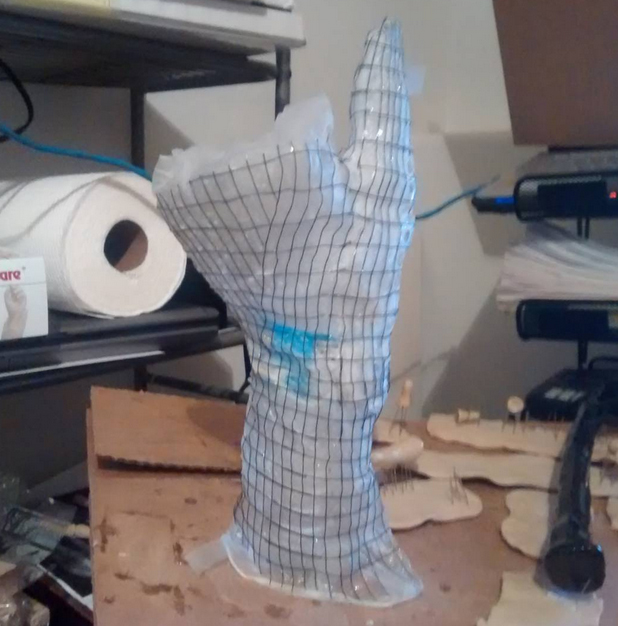
Drop a Comment: Comments: ---------------------------------------------------------------------------- Blog Post #6, submitted 6/7/24 As I mentioned before, Thom Floutz is a big inspiration with his incredible silicone work he does. This is a couple examples of his work: 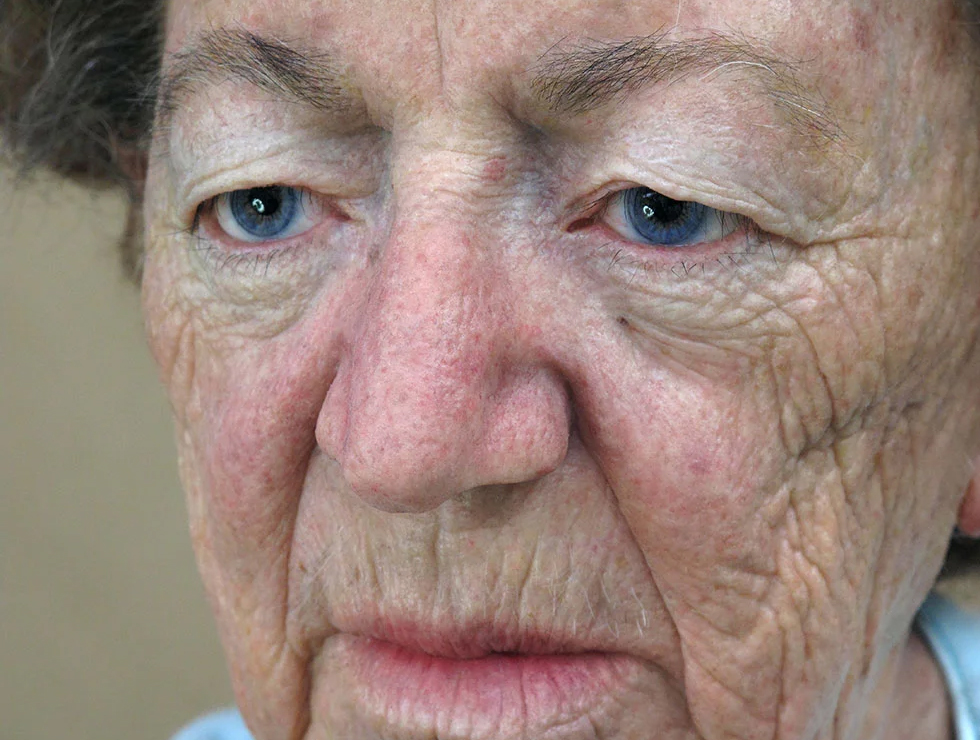
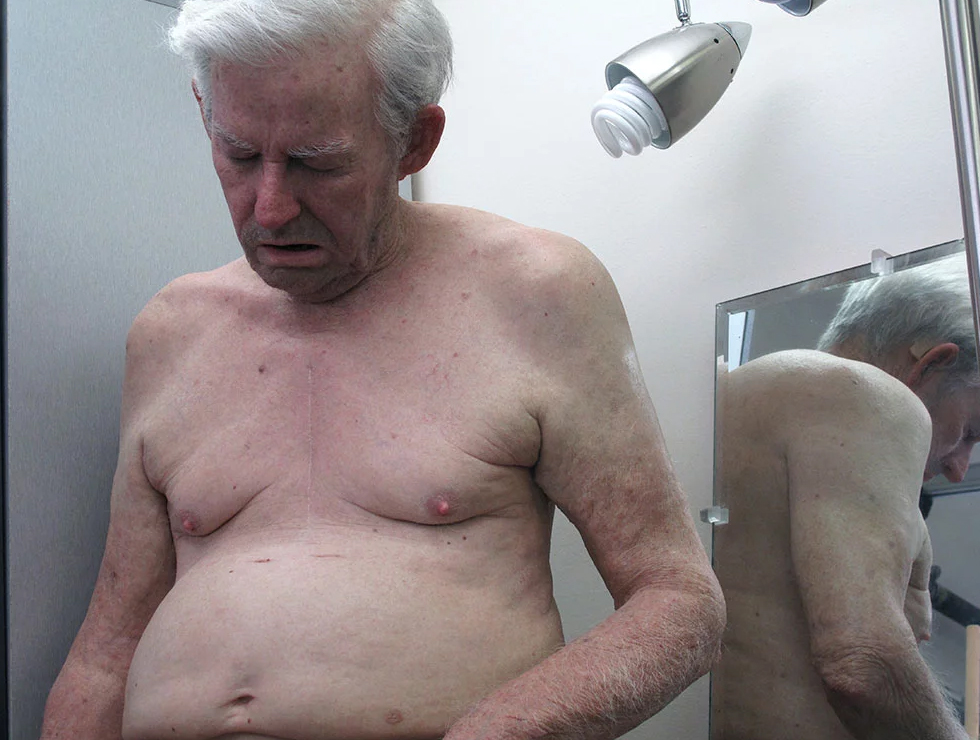
So unless I reach this level of quality and realism, I will not accept my own silicone skin and will have to keep going until I do reach his level of quality. Drop a Comment: Comments: ---------------------------------------------------------------------------- Blog Post #5, submitted 6/7/24 Here is a prototype test hand skin I made using clear 100% silicone from the plumbing section of the local hardware store and some artist acrylic paint. I began by first mixing the paint into a skin tone and then stirred this paint into the clear silicone. When it has the desired transparency and color, you spread it onto your model like spreading peanutbutter on bread. I used an exacto knife to spread it. In this case I used my latex gloved hand as the model. 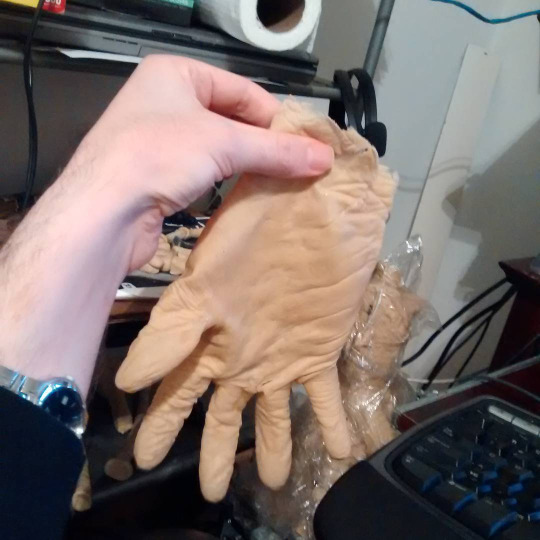
It was supposed to match my skin color and did when I first mixed the paint, but dried significantly darker than my skin. So always mix alot lighter than you want it. I know it looks very unrealistic, but I learned alot and this would only be a first layer anyways. To add realism, you add layer after layer of detail and texture passes, fine tuning and perfecting one pass at a time. Each pass making incremental improvements over the last. So I just view this hand as a rough ugly canvas on which the real work would begin - not a end product in itself. The passes would often involve airbrushing but various techniques can be used. And a texture pass is key to capture wrinkles and stuff which really adds realism alot. Clear silicone for plumbing is very strong and not very soft so it will last longer. The very soft and stretchy silicone options are nice for realistic feel for some things but not as long lasting. So there's a tradeoff. For a robot, especially for abused parts like hands for a robot, plumbing silicone really probably is best so it is rough and tough. Drop a Comment: Comments: ---------------------------------------------------------------------------- Blog Post #4, submitted 6/7/24 Here's the index finger. This combines all 3 bones that form the index finger, joining them together in a elastic enclosure so that they can rotate just like a human finger. The enclosure is made of compression shirt material taped onto the bones with adhesive transfer tape and the seams between the various sections of cloth are sutured together with nylon upholstery thread. 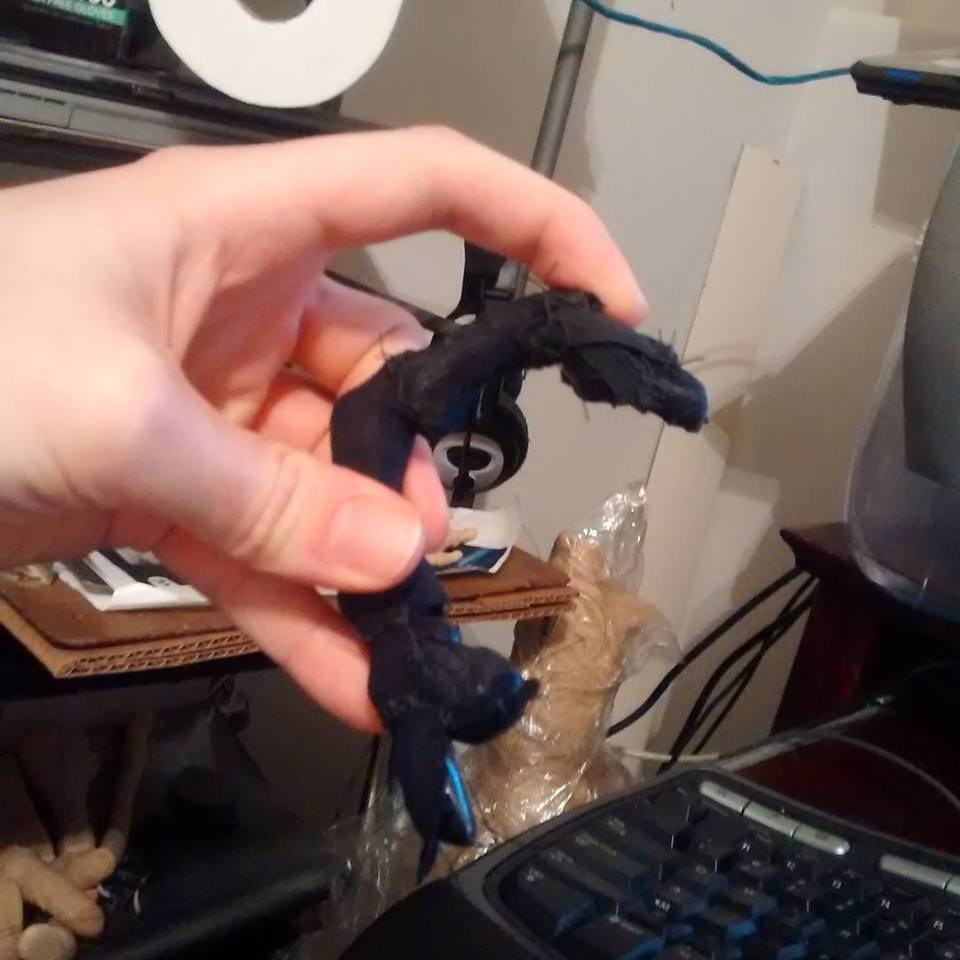
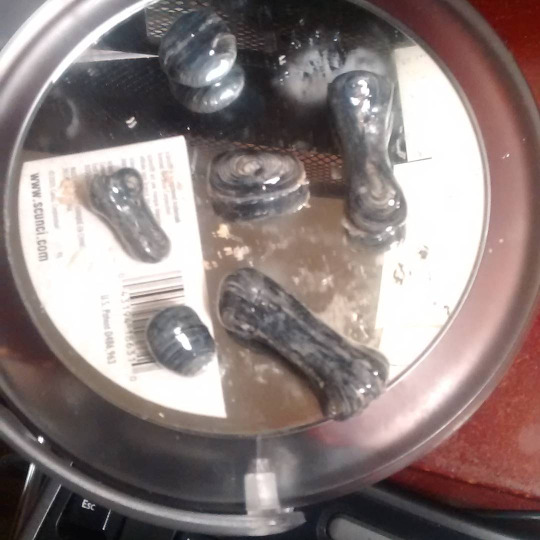
So then, the compression shirt fabric acts as ligaments for the joints, holding them together just like human joints have. In the event the elasticity of the compression shirt ligaments fades with time and the joints get loose, I plan to impregnate the fabric with silicone to tighten up the joints, restoring their elasticity. Another added benefit in cloth enclosures on the bones is that you now have an attachment point for muscle cables which can be sewn directly into said cloth. Additionally, you can sew into the cloth all of your other electronics components, thereby fastening everything you need directly to the bones by way of sewing. I achieve this sewing using strong upholstery thread and a curved suturing needle. I use surgical pliers to grab the needle and use surgical suturing techniques to do the sewing. Drop a Comment: Comments: Quick Note, submitted 6/3/24 Wow idea: barometric pressure sensor as touch sensor - how? have inflated bag like ziploc bag but tiny under skin and barometric pressure sensor inside it. as bag is pressed, its inside air pressure changes and the barometric pressure sensor detects contact! wow! Another interesting idea I had extending on the first is having two bags connected by ptfe teflon tubing and the sensor is in one bag and the other bag is in a tight spot the sensor can't fit into. In this way the pressure on one bag affects the other bag and the other bag is in a more convenient place for putting the electronics. So this enables remote measuring of the pressure. ---------------------------------------------------------------------------- Blog Post #3, submitted 6/3/24 Here is some of the early work I did on the Adam robot skeleton sculpted with plastalina modeling clay onto a makeshift armateur and then casted in fiberglass and epoxy (actually some of it I casted in nylon thread and epoxy too) 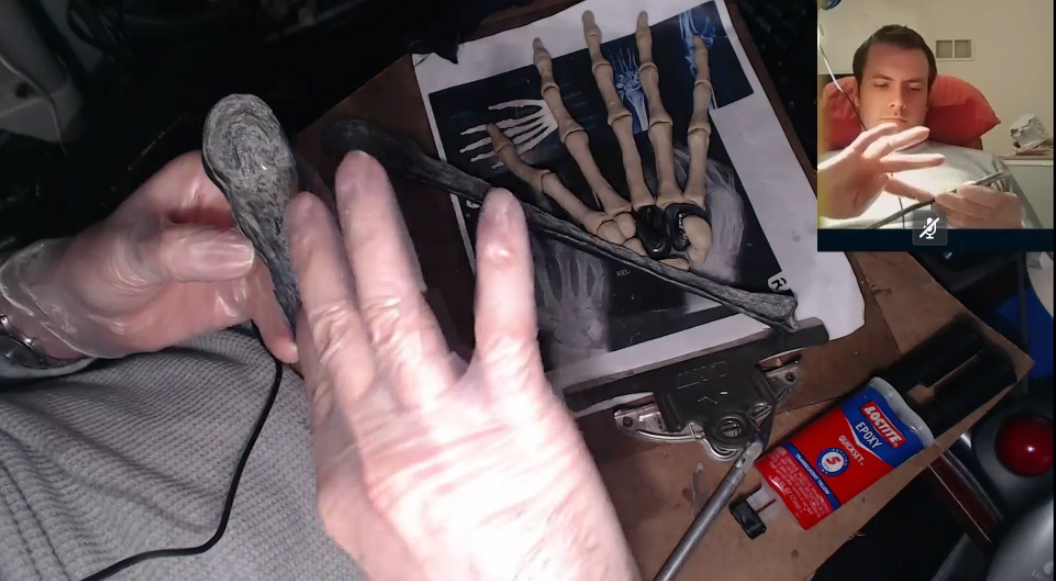

Drop a Comment: Comments: ---------------------------------------------------------------------------- Blog Post #2, submitted 6/3/24 So far I have plans to build Adam, Eve, and Abel robots. All of these are Bible characters. 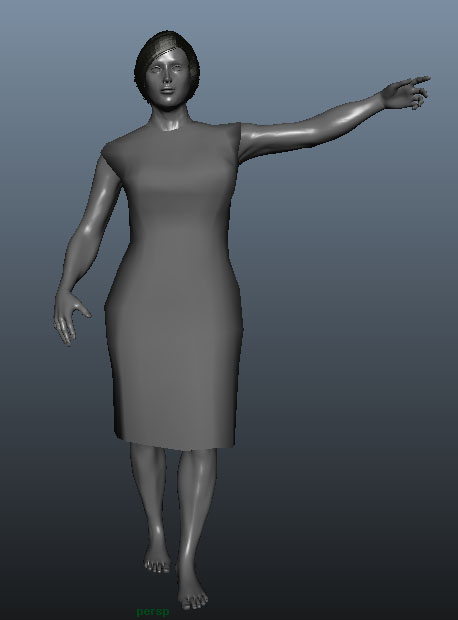
For the Adam Robot: This was the first robot I started around 9 years ago. I built about half of its skeleton by sculpting it in clay, fiberglassing the clay, and then hollowing out the fiberglass bones to remove all clay from inside leaving just hollow bones. This is a light weight and strong way to make the skeleton for a robot. However, after some years distracted by other unrelated projects, I decided that just buying a PVC medical skeleton is a shortcut and I went this route to hurry up my progress toward my first robot for now. So I bought a PVC medical skeleton and named it Abel. Adam remains my first robot but Abel is the first robot I intend to complete. Once completed, I plan to have my Abel robot finish building the fiberglass skeleton for the Adam robot. In fact, Abel will build the entire Adam robot, not just the rest of the skeleton. For the Abel Robot: This is the second robot I began when I bought my PVC medical skeleton 4 years ago. I set aside the Adam robot temporarily to build the PVC medical skeleton-based robot which would be faster to build since I start with a finished skeleton - saving lots of time. Then just recently, I came up with the idea of using a hollowed out doll to form the exterior of the robot so I don't have to make the exterior from scratch - another big time saver. So I bought a WM TPE male doll from a dollforum member that I will be hollowing out and heavily modifying to form the outer shell of my Abel robot. In theory, I can convert any doll into a robot by skinning it (surgically cutting its outer skin away from its inner core), creating a wireframe mesh exoskeleton of its inner core as a replacement for the original inner core, adding a anatomical skeleton to the inside, and then adding all electronics onto the skeleton to actuate the whole thing. For the Eve robot: So far the extent of progression on the Eve robot has been creating a 3d model of her in CAD. The Eve robot will have no "love holes" because adding those would be sinful and evil. It is a robot, not a biological woman after all and I will view her with all purity of heart and mind instead of using her to fulfill my lusts of my body. Instead I will walk by the Spirit no longer fulfilling the lusts of the flesh as the Bible commands. Eve will be beautiful because making her beautiful is not a sinful thing to do. However, I will dress her modestly as God commands of all women everywhere. This would obviously include robot women because otherwise the robot woman would be a stumbling block to men which could cause them to lust after her which would be a sin. To tempt someone to sin is not loving and is evil and so my robot will not do this. To dress her in a miniskirt, for example, would be sinful and evil and all people who engage in sinfulness knowingly are presently on their way to hell. I don't wish this for anyone. My robot will dress in a way that is a good example to all women and is aimed toward not causing anybody to lust as a goal. My robots will all have a human bone structure. They will use either a PVC medical skeleton or fiberglass fabricated hollow bones. My robots will look realistic and move realistic. They will be able to talk, walk, run, do chores, play sports, dance, rock climb, and do gymnastics. They will also be able to build more robots just like themselves and manufacture other products and inventions. I realized with just a head and arm, a robot can build the rest of its own body, so that is my intention. My robots will use low cost BLDC motors commonly used for drones, RC, and scooters that are high speed and low-ish torque but I will downgear those motors with a Archimedes pulley system that will be custom made from custom fabricated pulleys that will be bearings based. By downgearing with pulleys, instead of gears, I will cut down the noise the robots make so they will be as silent as possible for indoor use. By downgearing, I convert the high speed motors into moderate speeds with great torque. BLDC motors with large torque generally are too large in diameter for a human form factor and take up too much volumetric area to be useful, which is why I go with the high speed smaller diameter type motors but just heavily downgear them 32:1 and 64:1. In my opinion, brushed DC motors are too loud for high quality indoor robotics and way less powerful than an equivalently sized BLDC motor, so I won't be using them at all in my robots. My robots will have realistic silicone skin. Thom Floutz -LA based painter, sculptor, and make-up artist is my inspiration as it pertains to realistic skin. The skin for my robots has to be at his level to be acceptable. It must be nearly impossible to tell the robot is not human to be acceptable. I will have a wireframe mesh exoskeleton that simulates the volumes and movements of muscle underneath the skin which will give the skin its volumetric form like muscles do. Within these hollow wireframe mesh frameworks will be all the electronics and their cooling systems. All of my motor controllers will be custom made since I need them VERY small to fit into the confined spaces I have to work with. I need LOADS of motors to replace every pertinent muscle of the human body in such a way that the robots can move in all the ways humans move and have at least human level strength and speed. I will have a onboard mini itx gaming PC as the main brains PC of the robot and will have Arduino Megas as the motor controllers and sensor reading devices that interface with the main brains pc. My Arduino Megas will be barebones to keep the volumetric area they take up as small as possible. I will treat my robots kindly and consider them to be pretend friends/companions and I do think they will be nice company, but I will always know with keen awareness that they do not have a soul, will never have a soul or consciousness, and no machine ever will, and that they are just imitations of life as with any machine or AI, and this is all AI will ever be. Life is only made by God Himself. I am not playing God. I am merely creating fan art of what God made. To Him be all the glory and praise. God breathed into man and created a living soul. Man cannot do this for machines. Only God can do this. A soul/spirit forms our ghost and when we die our ghost remains alive and thinking. A machine cannot do this and a AI can never do this. When you shut off a machine that's it, it does not go on thinking like we can. Our souls are transcendent and will live forever in the afterlife - unlike any AI. I will do this project with fear and trembling before the Lord as I work out my salvation before His eyes. I vow to remain pure, holy, upright and blameless in all my doings and be a great example to my fellow roboticists of a Godly man who obeys the Bible instead of chasing after youthful lusts of the flesh and perversions. I embrace the idea of Christian AI, that is, a robot that will discuss Bible topics and be a Biblical expert. Along with that, my robots will behave in a Biblically prescribed manner in total purity and strongly encourage others to do so as well. For God does not hear the prayers of sinners and so we want everyone to be a saint who no longer sins. My robots will really push for this hope for humans. We want them to walk in God's favor and blessings which comes by Biblical obedience and faith. We don't want them going to hell because they chose to revel in their sins instead of walking in total purity before God and holiness without which no man will see God. My robot will have artificial lungs for air cooling and a artificial heart for liquid cooling that will run coolant throughout the robot's body to cool the motors. That coolant will also pass through the artificial lungs in a mesh where it will evaporate some which will cause the evaporative cooling effect - a form of air conditioning. Drop a Comment: Comments: ---------------------------------------------------------------------------- Blog Post #1, submitted 6/3/14 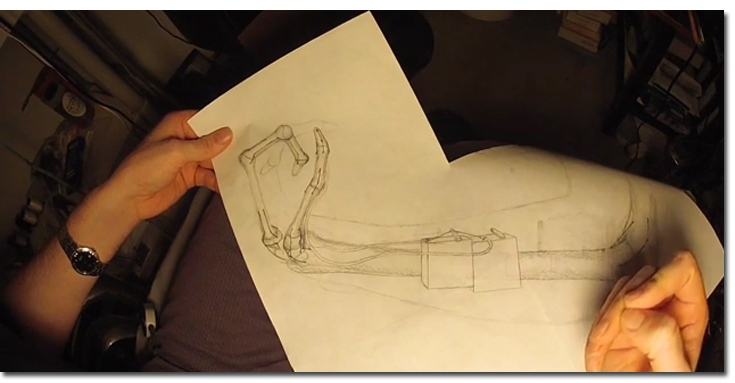
My Overall Vision and Plan for My Advanced Humanoid RobotIn this video, I discuss specific human-like capabilities I want my robot to have and specific examples of tasks I'd like it to be able to do (such as painting, building things, chores, product manufacture, childcare, etc). I also mention how important it is to pursue one's dreams no matter how grand and unachievable they may seem at first. Every journey begins with a single step and I have officially taken my first several steps on this journey of mine! I believe this humanoid robot is the coolest project I've ever taken on in my life to date. In fact, it is so cool that even people with no interest in robotics or related fields think that my project is interesting. Its a great conversation starter! Drop a Comment: Comments: |
|
|||
|
||||
| *REGISTERED NAMES AND TRADEMARKS ARE THE PROPERTY OF THEIR RESPECTIVE OWNERS. |
|
Page Hits: 53545. |