| |
|
|
|
|
|
|
----------------------------------------------------------------------------
Blog Post #90, submitted 8/27/25 Ok I figured out a bit easier way: tie a knot at each end of the strip of bracelet cord and then tie my nylon thread off onto the bracelet cord inside that bracelet cord knot. The bracelet cord knot on each end acts as an endstop. Seems to work great so far and cuts down on materials this way over the previous way I proposed. 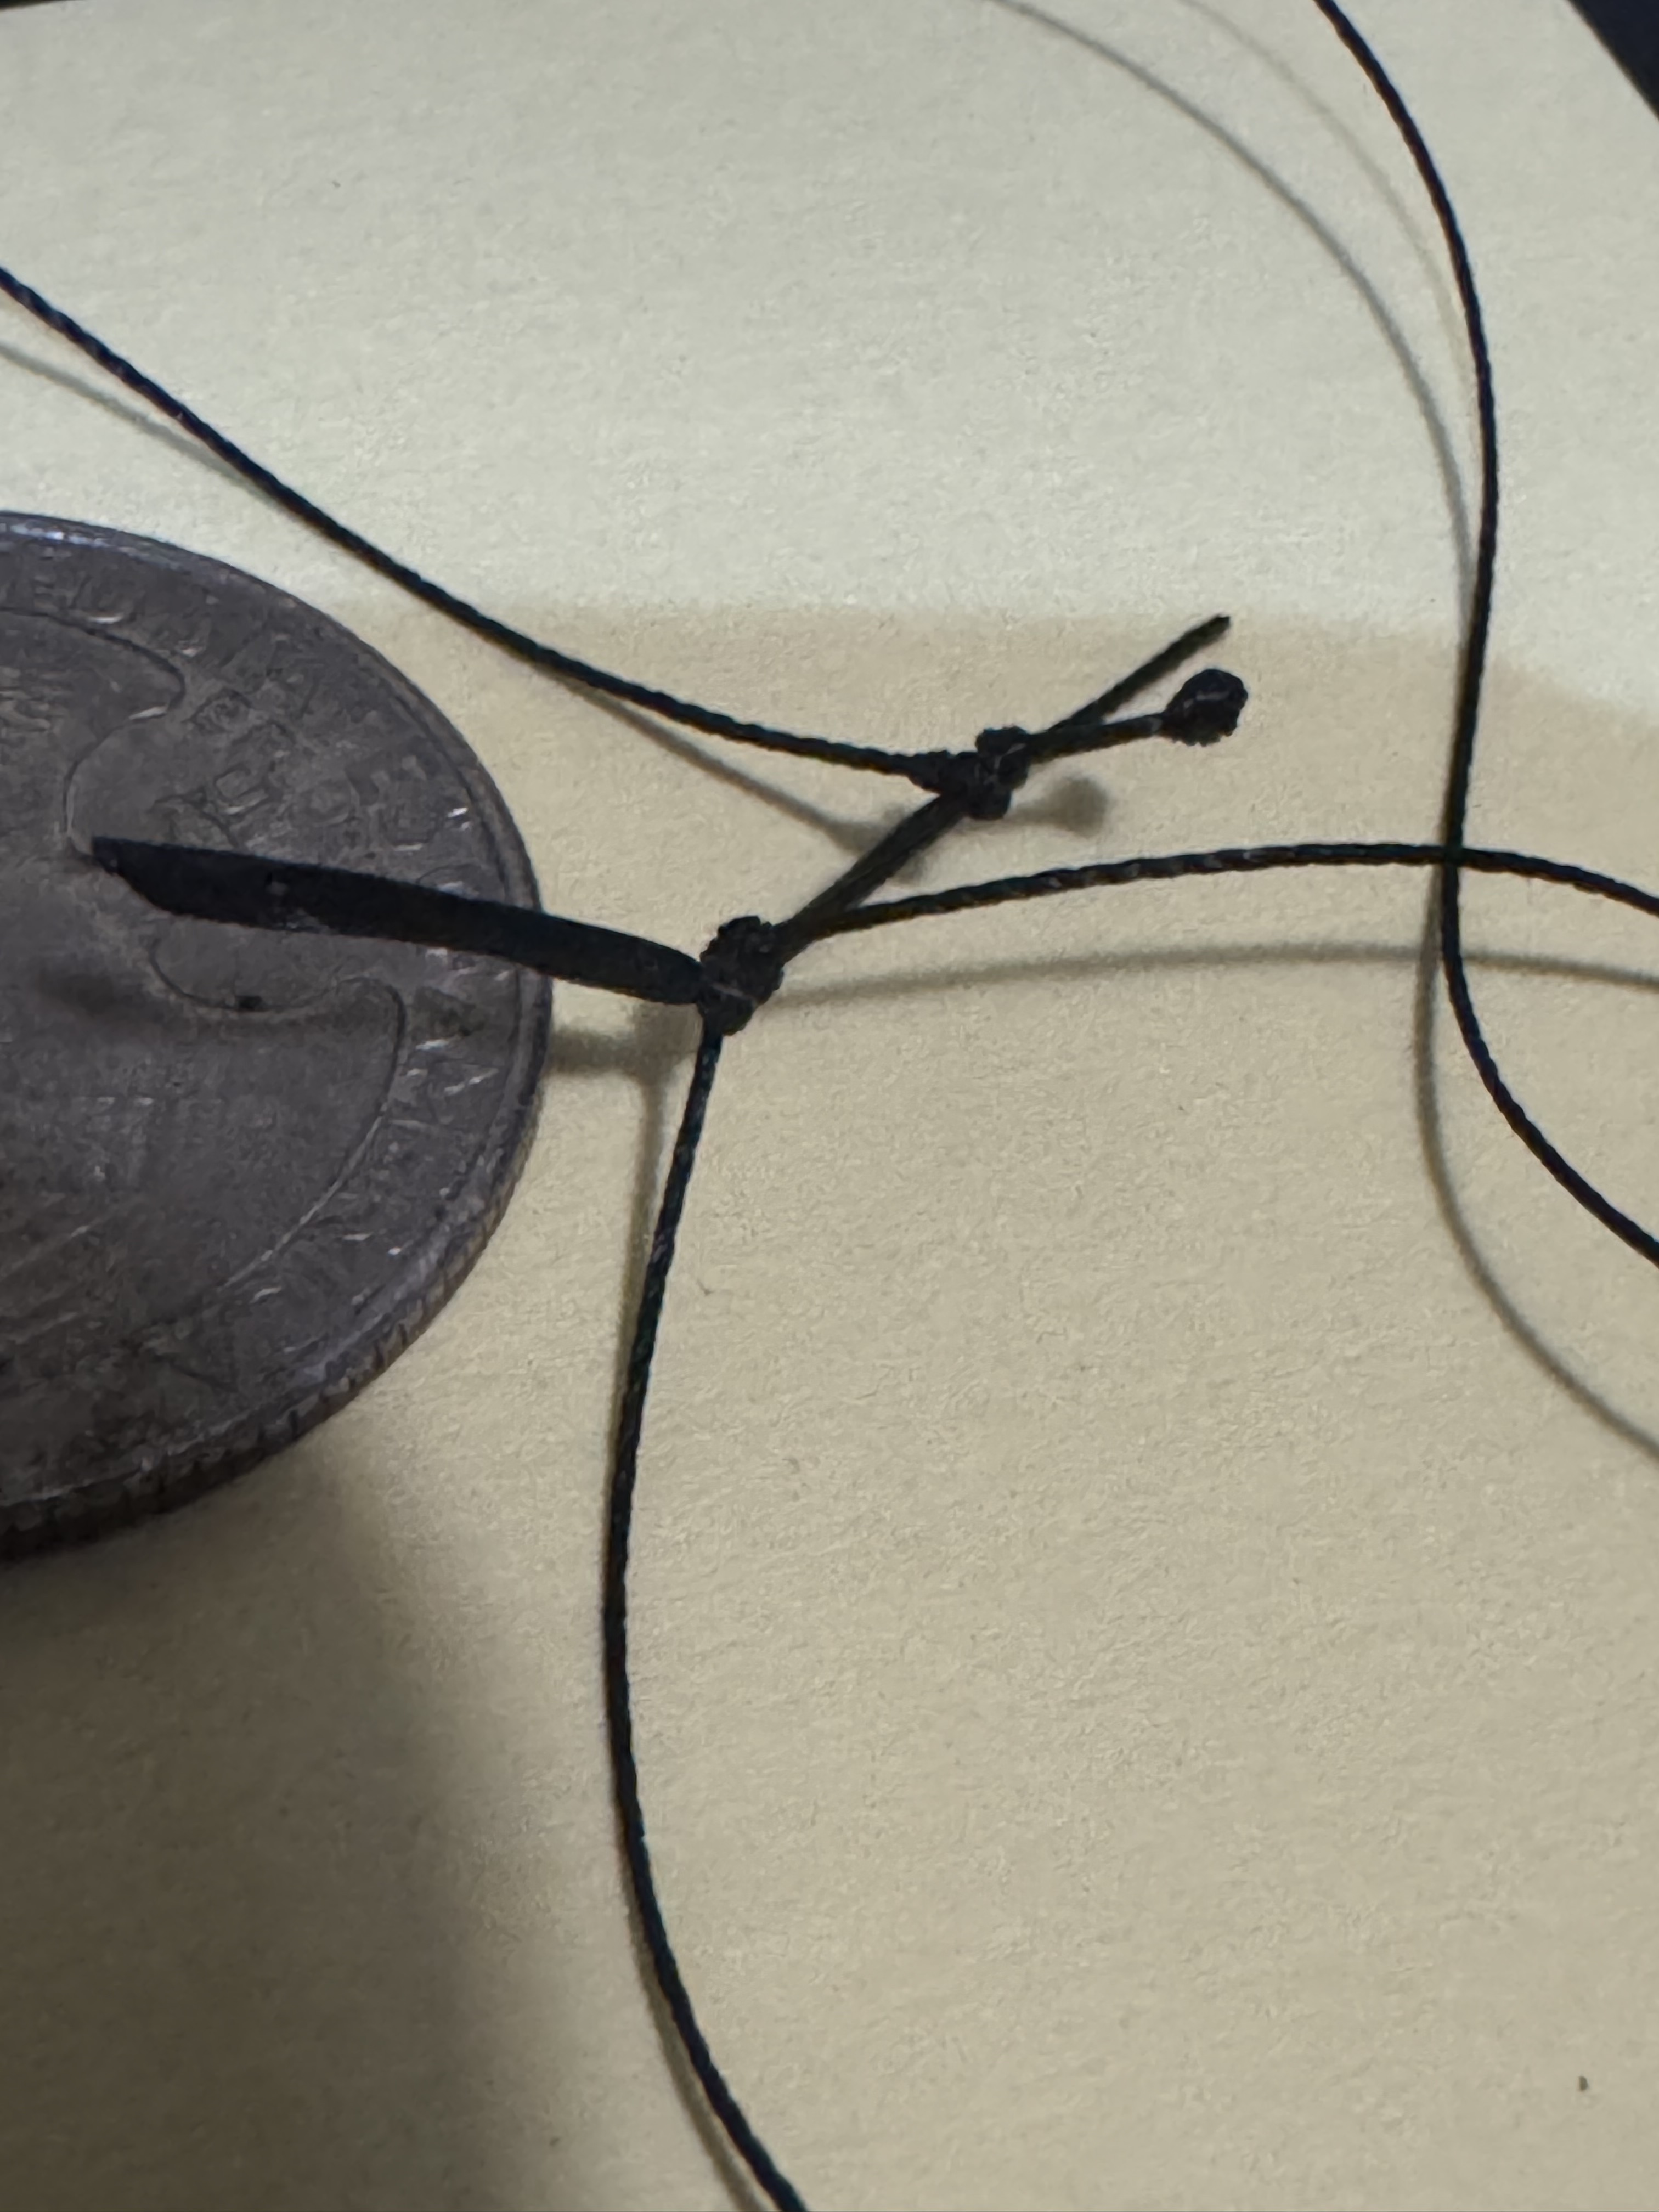
Drop a Comment: Comments: ---------------------------------------------------------------------------- Blog Post #89, submitted 8/20/25 I figured out a robust way to make the extension cord for finger extension using the bracelet cord and a fishing crimp sleeve. The idea is to crimp the two ends of a folded in half strip of bracelet cord and this way both ends can be sewn down into the fabric without any gluing which could potentially fail or be a weak point. I am planning to use this in place of the tension spring style finger extension setup. 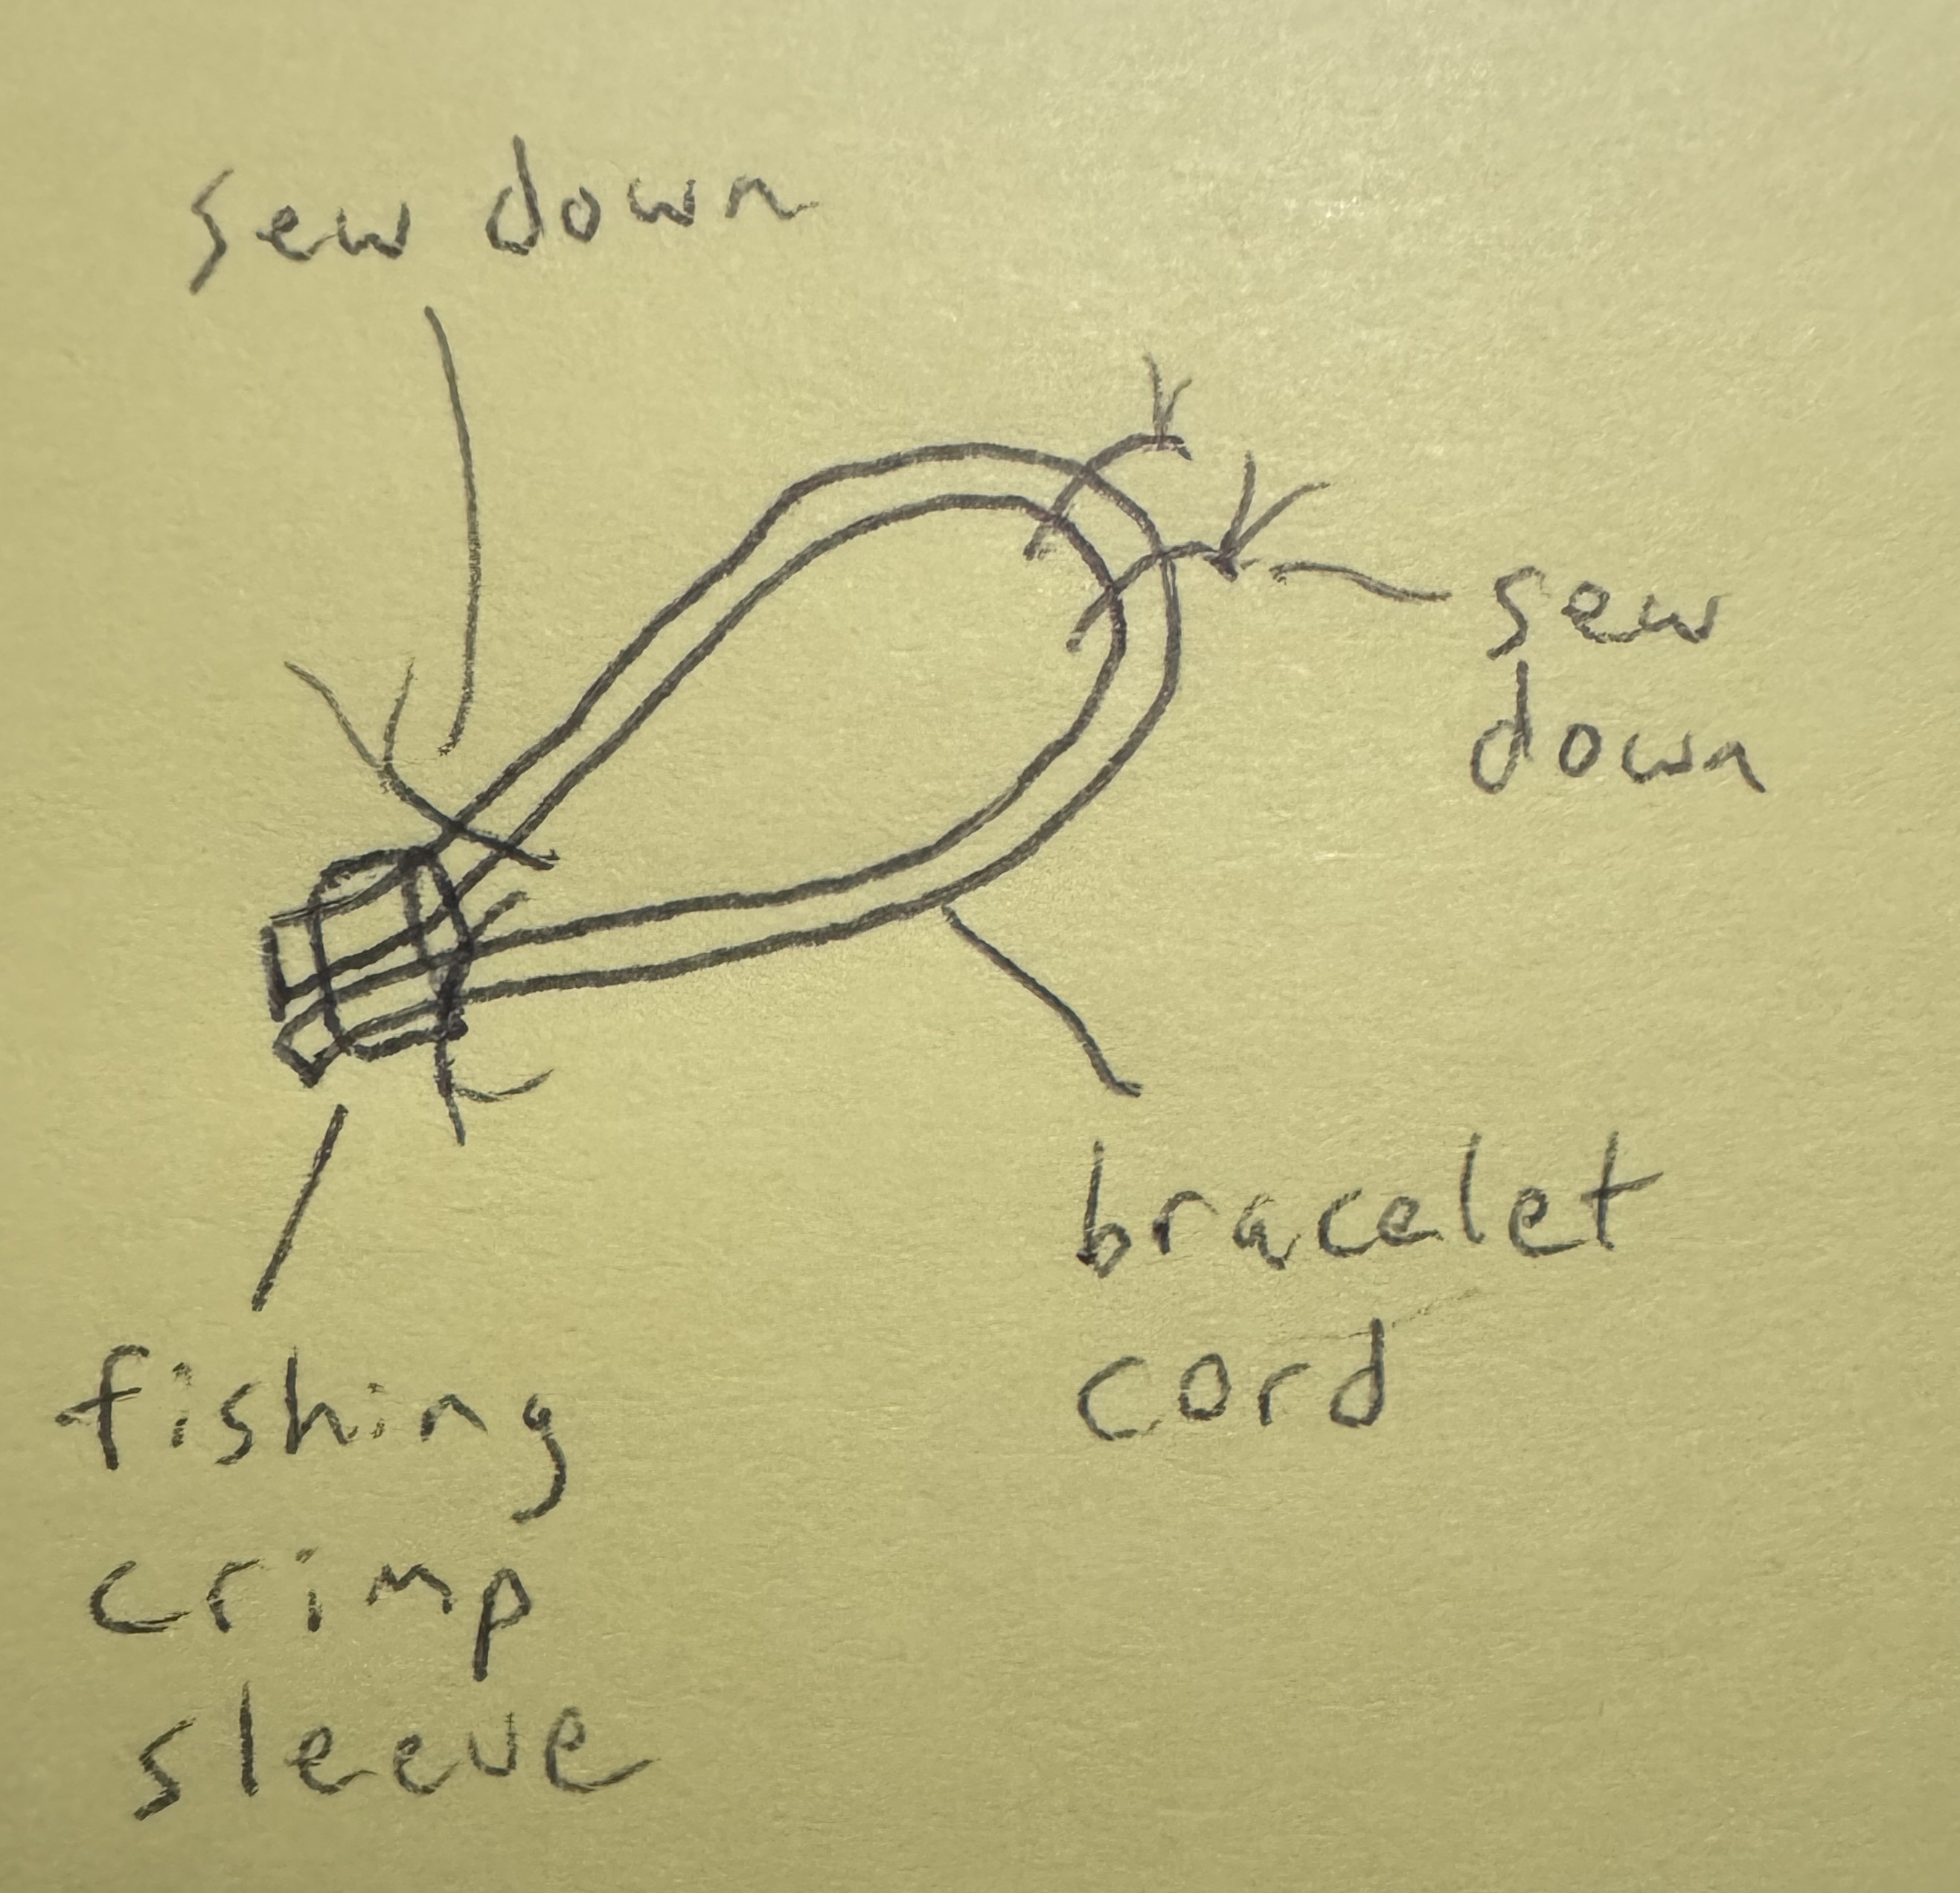
Drop a Comment: Comments: ---------------------------------------------------------------------------- Blog Post #88, submitted 8/2/25 So in recent testing a fresh issue I ran into was the TPFE tubing would start gradually pulling through its tightly wrapped tape sleeve to my surprise. Its low friction surface gradually pulls free of the tape over time. To resolve this, I decided to thread through the tip of the tubing to create a mechanical bond for the tip and once threaded through I just 401 glued down the ends of each thread onto the sleeve that was originally supposed to hold it in place to begin with. This seems to work great so far in the little bit of testing I've done since. 
Drop a Comment: Comments: ---------------------------------------------------------------------------- Blog Post #87, submitted 8/1/25 The tension spring mounted to the motor setup upon further testing seems like a somewhat bad method. The issue I'm having is too much play in the tubing running between that spring and the finger joint. When tension is applied to that spring by way of the tubing, the tubing recoils and moves quite alot and allows alot of slack out to the joint so that the spring has very little involvement in the joint and doesn't really get used much period. So the full range of motion of the joint is just absorbed by tubing slack. When I tried to pretension the tubing so that the joint movement translates to the spring, the total tension placed on the joint by this became too high. Fortunately, I came up with a much more elegant and simple solution for all of this. Basically, my plan now is to just use the bracelet cord tied point to point across the joint directly on the joint and that will be my spring for extension that counters the motor. This eliminates the need for metal springs at all which cuts costs, it also eliminates the PTFE tubing run, saving some space, and should be easier to install and easier to give precise amount of elasticity/resistance to taste. If I want more springback on the joint I can just add more bracelet cord in parallel to the first. This way I can add more resistance pretty easily. 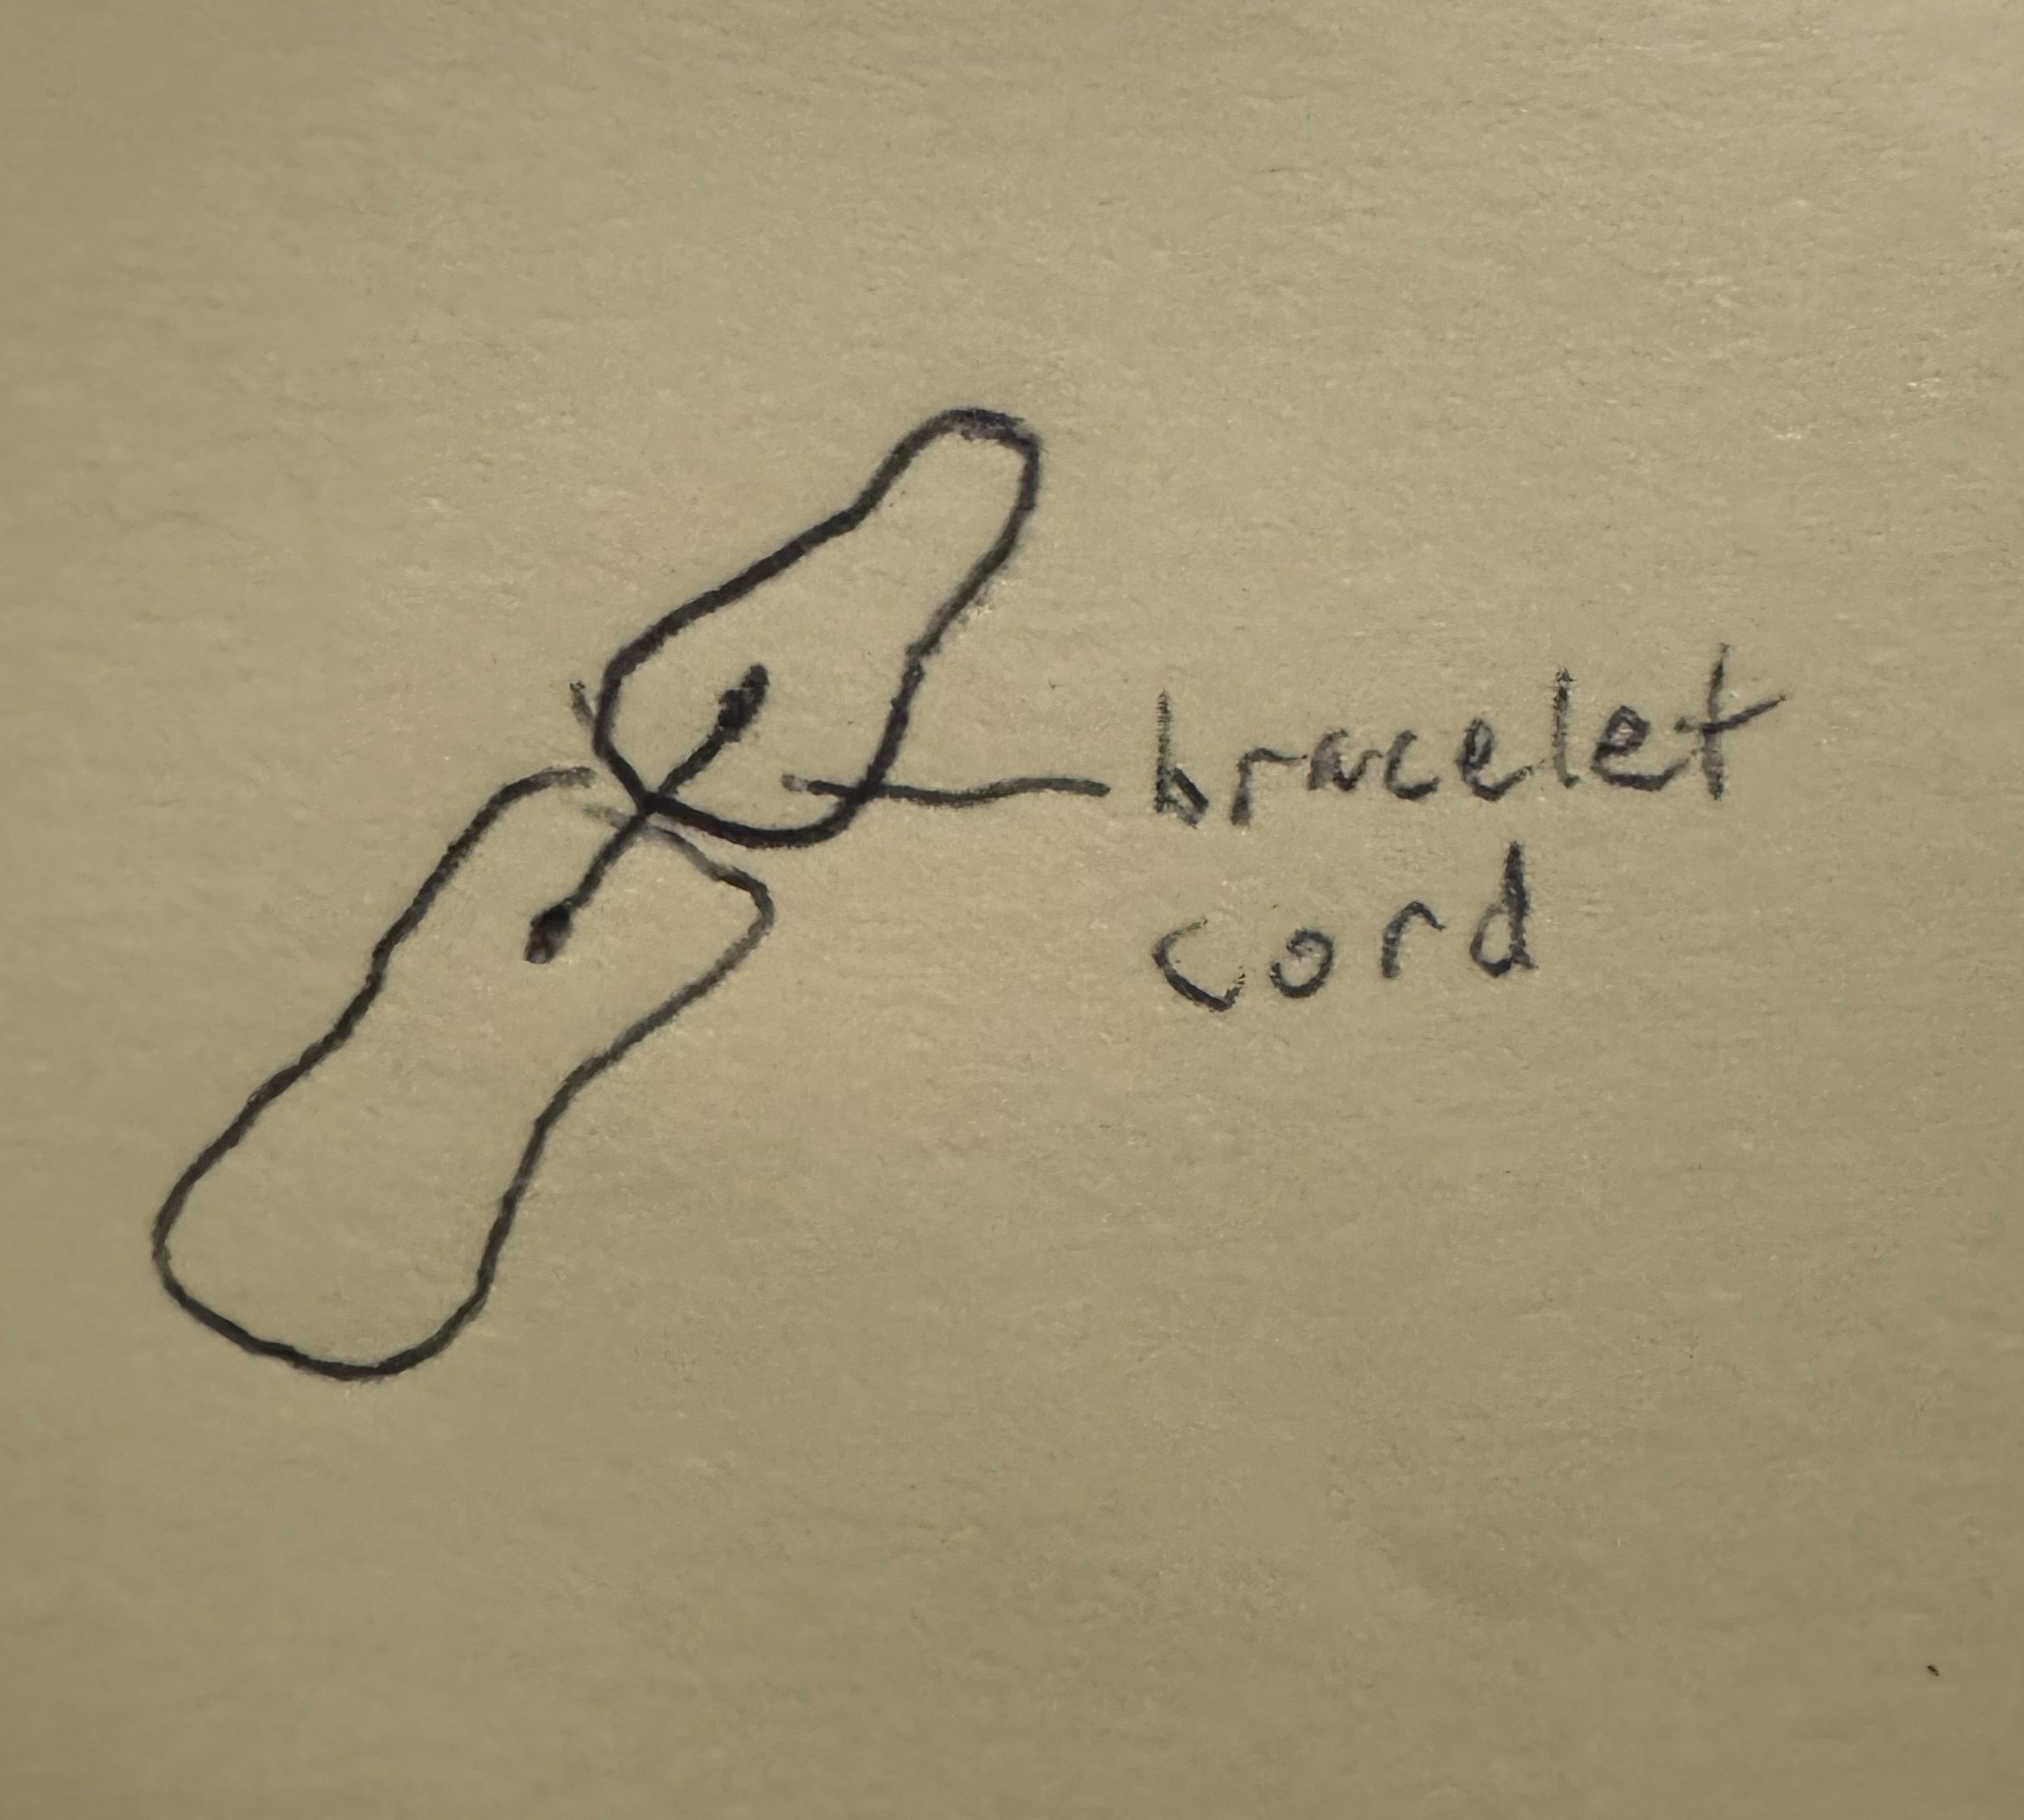
Drop a Comment: Comments: ---------------------------------------------------------------------------- Blog Post #86, submitted 7/21/25 I finally finished making the tensioner mechanism for the winch in place pulley and I taped it off up the string descending from the ceiling and taped the far end of it onto the ceiling. I noticed I have to keep it as straight as possible since when curling with too much turning the elastic bracelet cord grips the sides of the PTFE tubing which could interfere with the amount of tension it brings to my winch in place pulley. So this will mean on the robot itself it will have to go from the shoulder all the way down the torso in a straight line and then down the leg to about the knee as well. It's 44" long in total. I ended up bumping up the elastic bracelet cord to 30" long to reduce the amount of tension it puts on the winch in place pulley more. The longer it is the less tension it brings and the shorter it is the more tension it brings. If it really can't fit into the leg I can cut the elastic bracelet cord in half and place braided PE fishing line in between the two halves and have that make a 180 degree turn around a pulley and thereby have the same length of elastic bracelet cord but separated into two halves mounted parallel to eachother that create a in series matching tension but taking up half the overall length. This way I could keep it out of the leg area if needed. However I think it might fit into the leg area fine perhaps. Not sure (once we get all the other motors and their tension strings that amount of 2.2mm OD PTFE tubing will start to add up. 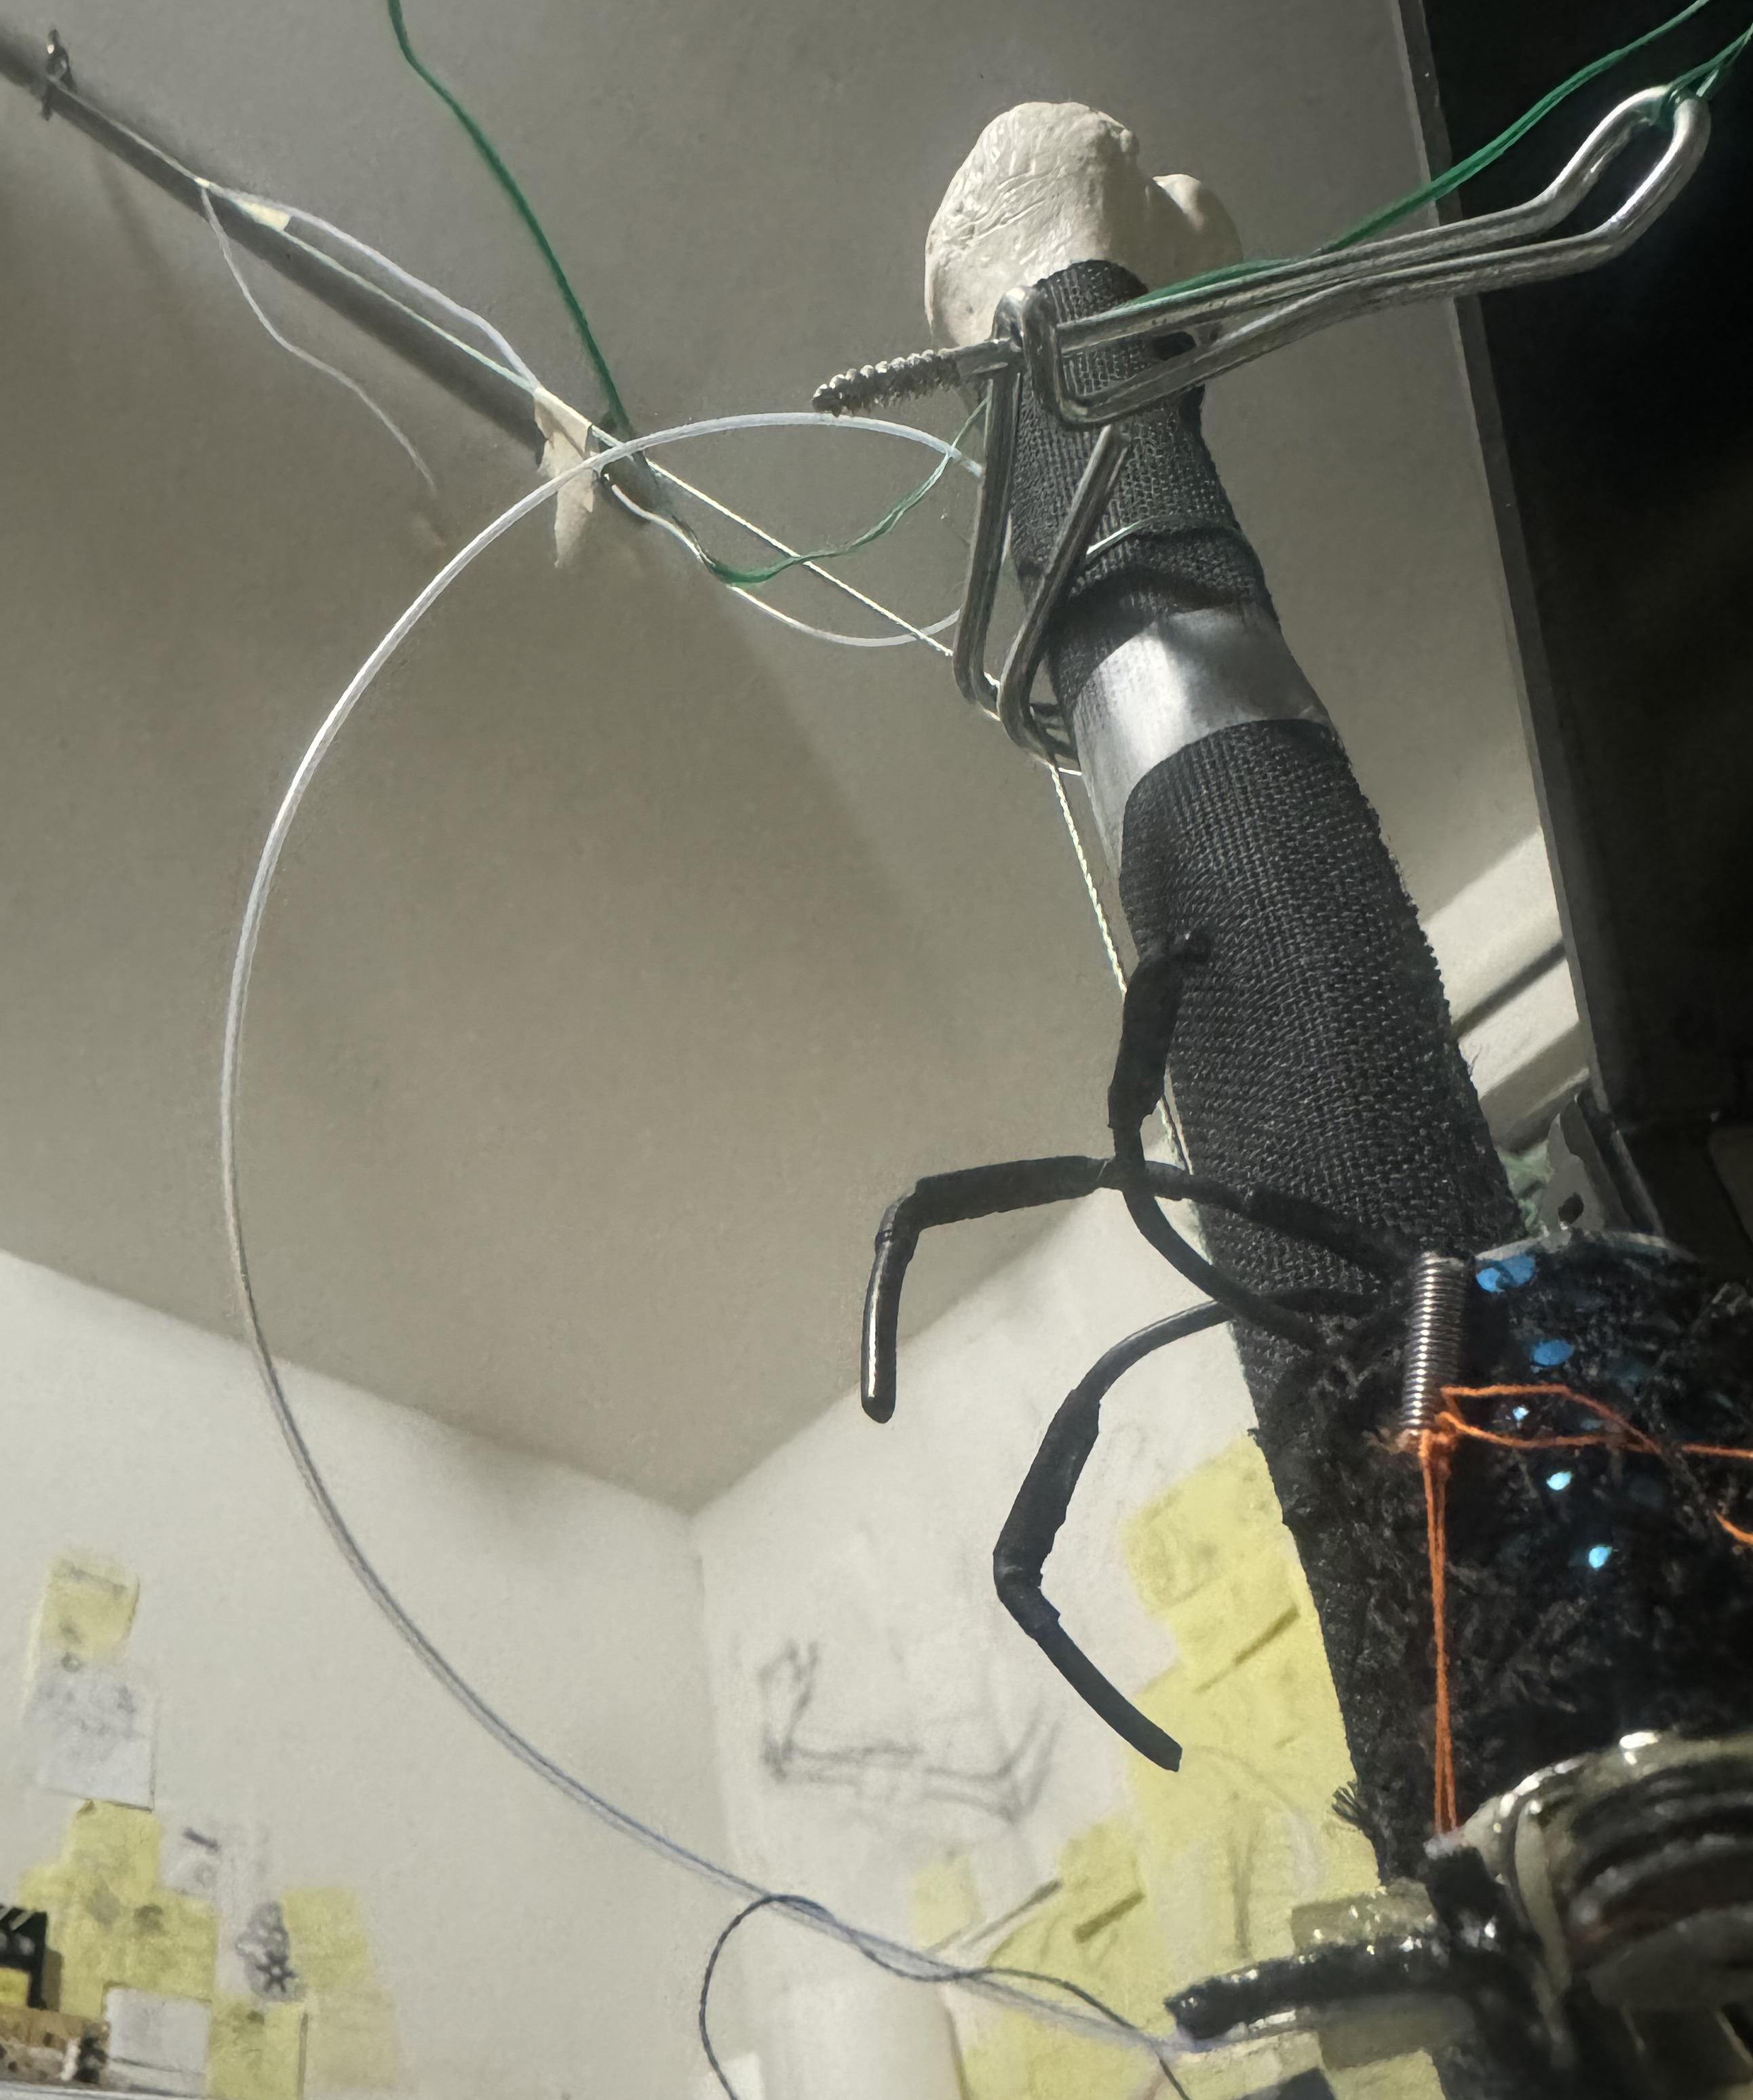
Note: I'm also considering taking the elastic bracelet cord out of the tubing and lubing it then putting it back in since lube on the grippy elastic bracelet cord would take away it gripping the sides of the PTFE tubing some I think. Silicone lube is best for this according to chat gpt. Note: to secure the far end of the elastic bracelet cord I used 401 glue to glue on PE fishing line onto its end the same way as we discussed before and then took the far end of this PE fishing line and came out the end of the PTFE tube with it and taped it off onto the outside of the tube. We'll see how that holds up it might need to be glued down if it gradually is pulled through the tape over time which would be no good. Drop a Comment: Comments: ---------------------------------------------------------------------------- Blog Post #85, submitted 7/19/25 Minor update: I have now carefully mounted the PTFE tubing that leads to the elastic string tensioner for the winch in place pulley. I mounted it snugly to the side of the PTFE tubing coming off the same winch in place pulley that leads to the Archimedes pulley system. I routed both of these using my CAD for reference in such a way that their routing will not interfere with the next motors that will be installed later. I mounted this PTFE tubing that leads to the elastic string tensioner using ONLY 401 glue which is something I've never tried before now. Usually I first wrap the tubing in adhesive transfer tape and spandex cloth wrap and coat the cloth in 401 glue but skipping that made it able to be more snugly mounted to the other tube by way of only glue. We'll see how that holds up without the other reinforcement the cloth provides etc. Seems to look so far so good though. They are in turn glued to paper soaked with 401 glue and to a little piece of stainless steel wire bent at a 90 and that wire in turn glued to the winch in place pulley mount baseplate which is itself made of paper and 401 glue. So basically everything is becoming 401 glue construction! I have some concerns about how this will hold up in the event of a fall or w/e but perhaps we can create some sort of protective cage around any delicate outcroppings like this in the future. For now I am just going for ease of construction and speed of construction to get things back on track and rolling again. 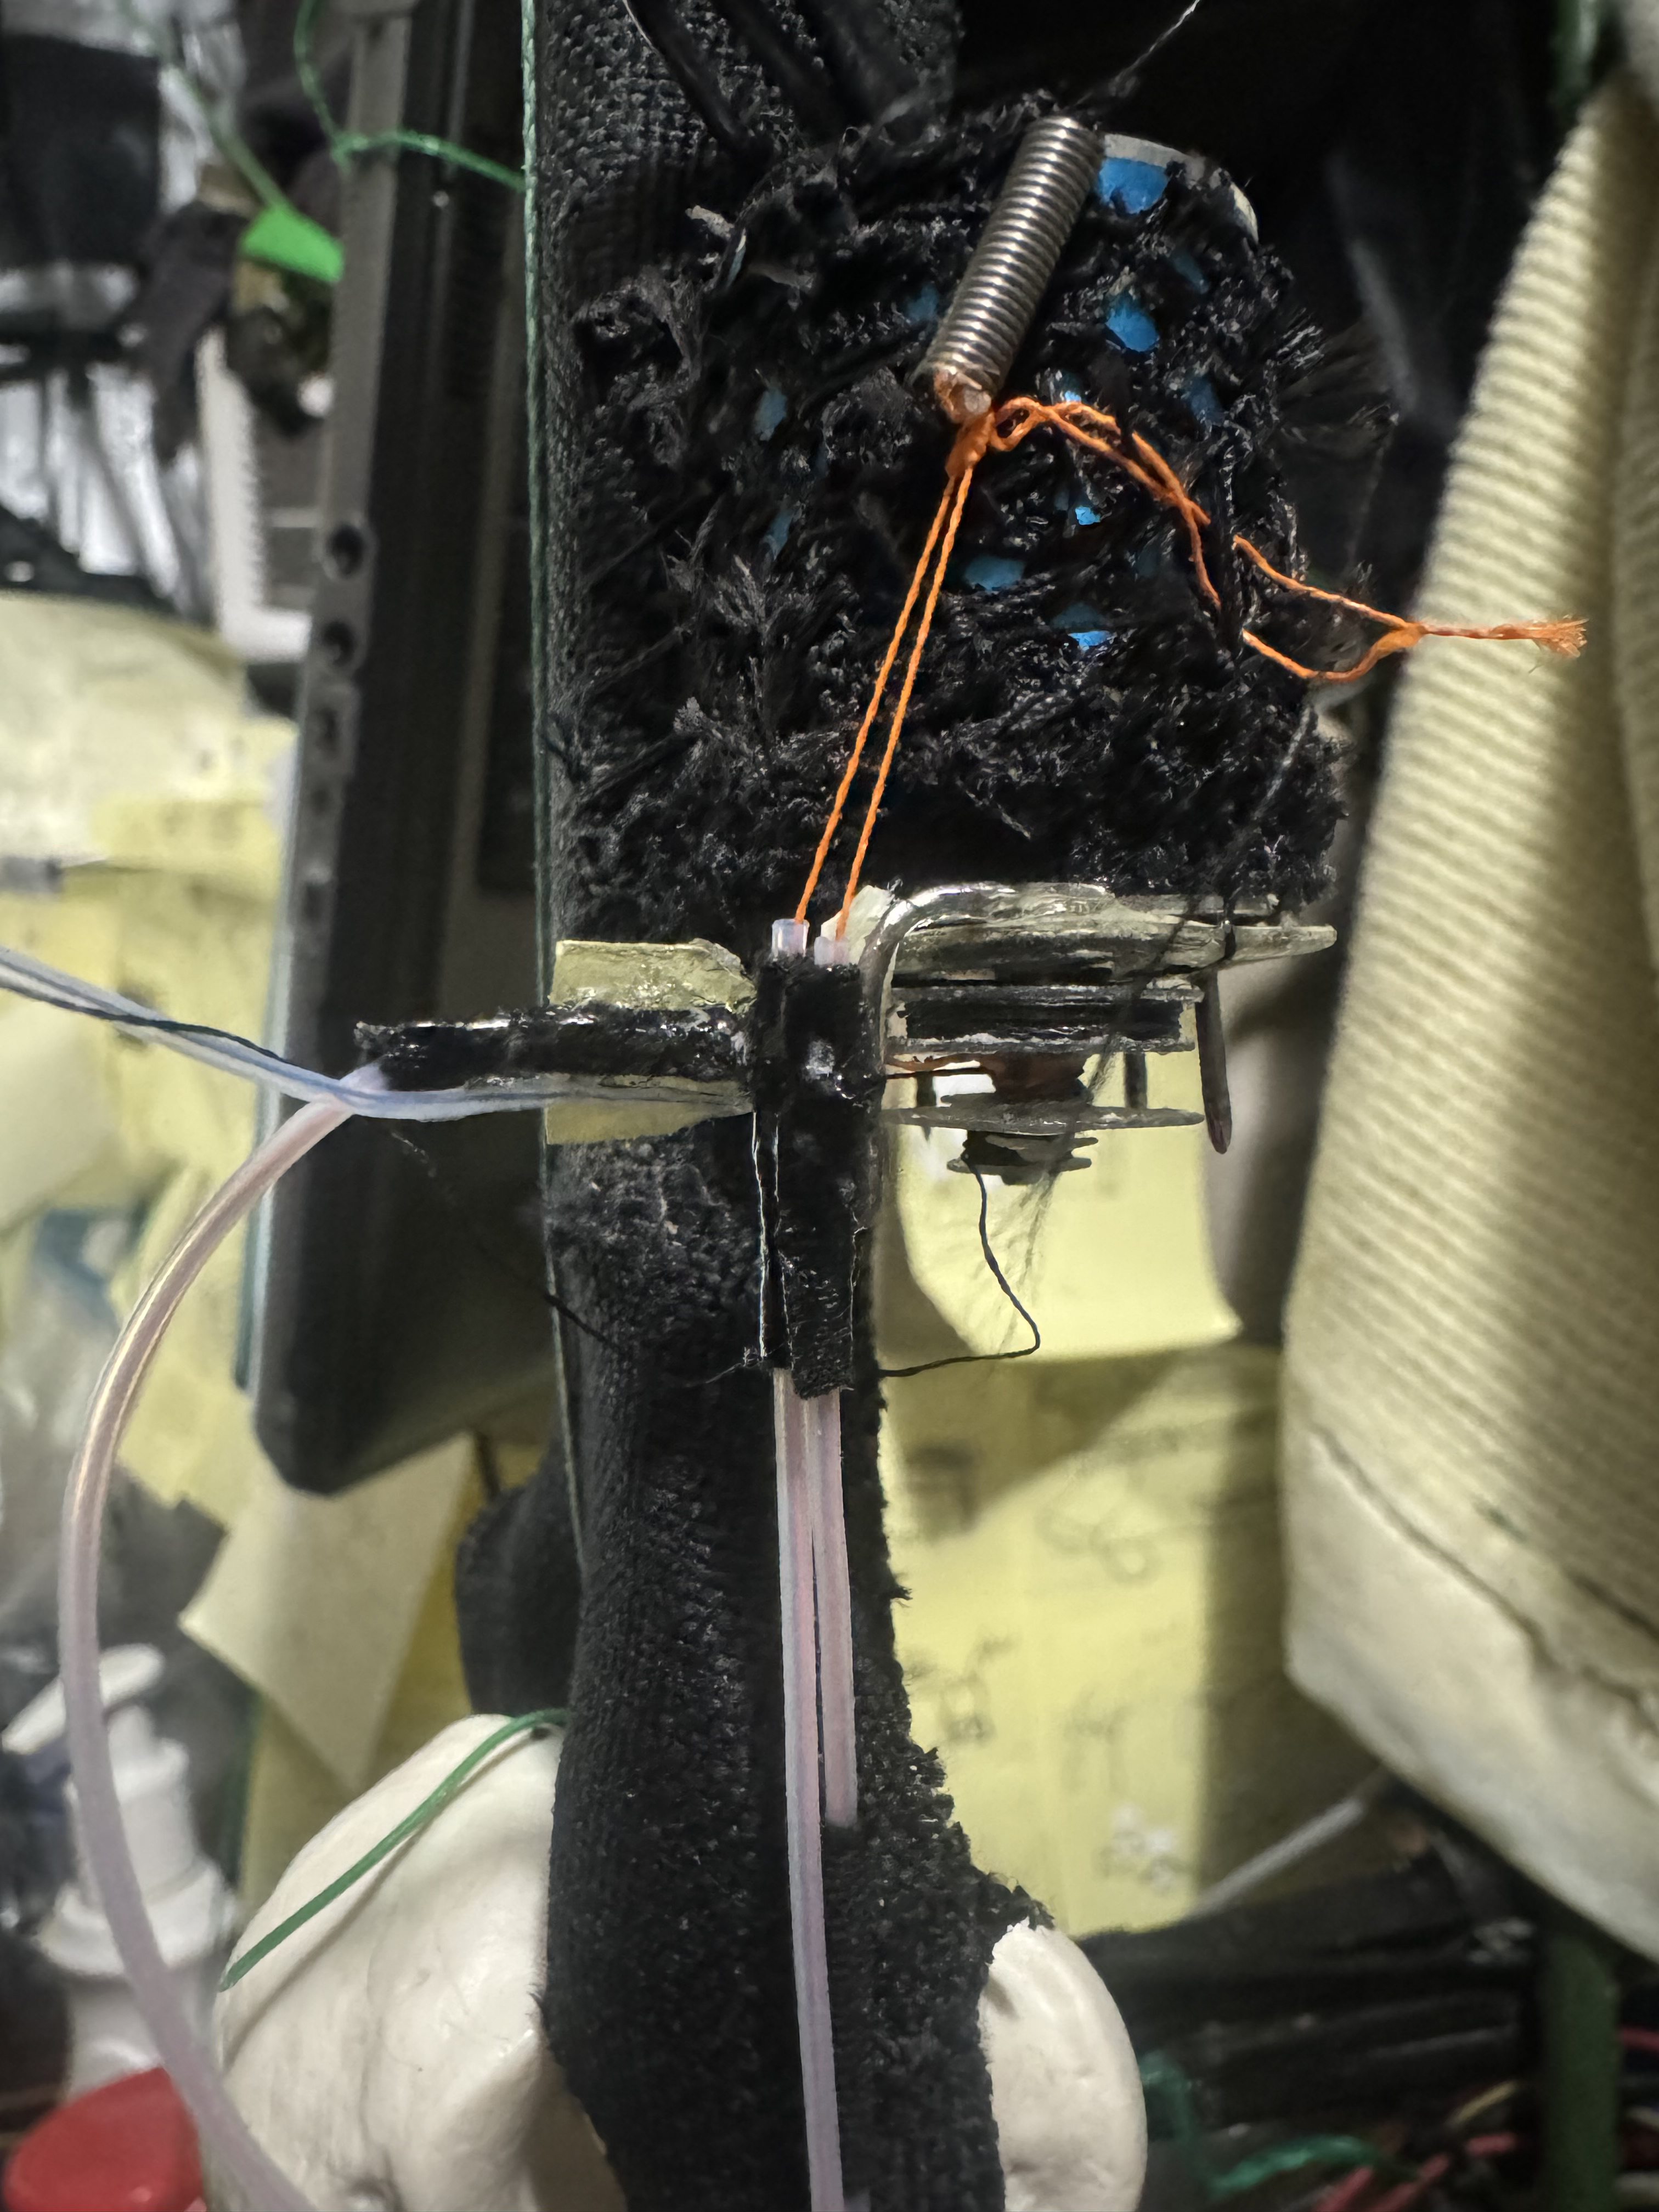
Note: The PTFE tubing that leads to the elastic string tensioner for the winch in place pulley is 0.66mm ID 1.16mm OD PTFE teflon tubing. The string coming off the winch in place pulley feeding into this tubing that will act as tensioner string tension carrier string is 6lb test 0.08mm PE braided fishing line. I was able to thread this fishing line into this TPFE tubing by hand with no issues at all very easily. The next task will be to mount the end of this string to the 2 feet of elastic string for jewelry making and thread that into 1.8mm ID 2.2mm OD PTFE tubing and tie it off at the end of that tubing and then mount that tubing to the gray string hanging from my ceiling for now. That will conclude the tensioner mechanism for the winch in place pulley and this will usher in the next round of manual hand testing to see how much tension that is giving us. I also will be moving the tension spring mounted on the motor to align it better and shorten it more since it only moves like 4mm and so can be way shorter than it is now. Drop a Comment: Comments: ---------------------------------------------------------------------------- Blog Post #84, submitted 6/13/25 Sometimes to get the braided PE fishing line threaded through the fine PTFE tubing can be tricky, so I came up with a neat device to assist in this. I will be making a threading tool based on a needle threader tool I've been using. It's basically a wire folded in half that you shove through a needle eye and then stick your string into its end and then pull it back through the needle eye. In my use case, I'm creating a custom one of these threading tools that will feed through my entire length of tubing till its folded end comes out the other side and I can thread my string through that end and then draw it back, bringing the string through the tubing with it. 

I just ordered some 40ga copper and stainless steel wire to use to make this device in question. I'll see which metal is best. Gonna try the copper first I think. Drop a Comment: Comments: ---------------------------------------------------------------------------- Blog Post #83, submitted 5/22/25 Ok so I currently have an order for 0.2x1x1000mm tension springs stuck in customs for weeks and placed another order just today for the same in hopes it goes through faster. But at $9 for a single spring that is 3ft long, I am feeling RIPPED OFF on price. It is bullcrap. All relating to the tariff nonsense. So I decided today to pivot and just roll with the elastic band in place of tension spring. It's a jewelry making elastic band I bought some time ago in a roll. WAY cheaper at $0.03 for 3ft instead of $9 for 3ft. That's 99.7% off! Talk about a discount! The issue I had before when I looked into this option was the tie-off point. I would need a way to tie PE fishing line to the end of the elastic band without the tie point being bulky. Well I figured out a way to do it without any bulk at all! See I want this to fit into my 1.8mm ID PTFE tubing to keep size down. My solution was to just glue the fishing line lengthwise directly to the elastic band. No knot at all. No turns at all. Just literally lay it on top and glue it down flush. I figured about 6mm length of joint would be solid. And I did this on both sides with my PE fishing line. I used 0.08mm 6lb test braided PE fishing line for this. So now I have two fishing line segments coming off the end of it for double the strength of this connection. But I only wanted one piece of fishing line to go the distance to attach to the motor end so I twisted the pair of fishing line segments together and glued the twisted pair with 401 glue then cut one of the two away leaving just one of the pair to go the distance to the winch in place pulley that this is all supposed to tension for me. I will use this string and elastic band method for now as I wait on springs and stick with this method for at least this first motor actuator setup for now. If the elastic bands don't last, we'll upgrade to the metal springs later on during maintenance or w/e. Note: the total length of the elastic band I am using for this is 2ft and it stretches to 3ft snugly without too much force. I'm just going by feel and instinct for this measurement. If I were to go 1ft with 1ft of stretch, the stretch is more intense and the pull is harder. But I don't think I need much pull for just tensioning the winch in place pulley and I also think the more tension you place the more wear and tear on the elastic band which will shorten its lifespan. So playing it conservatively with the 2ft length selection for now. Note: to apply the 401 glue I used an exacto knife handle with a sewing needle in place of the xacto knife blade and the tip of the sewing needle acts as my precision glue applicator. Drop a Comment: Comments: ---------------------------------------------------------------------------- Blog Post #82, submitted 5/10/25 Good news: I had mentioned before I was planning to use 2mm OD tension spring for the winch in place pulley tension solution but once I got the 3mm ID 4mm OD PTFE tubing to go over the spring, I saw that the 4mm was just WAY too big once you multiply that out to 300 motors. 300 of 4mm OD tubing starts to take up a massive area at that point and I struggled with that. I MUST be miserly on space taken up by parts to get all the crap I need to fit in there to fit in there! Anyways, I fortunately discovered that you can buy tension spring down to 1mm in OD! I was unaware of this before now! You can find it if you search "0.2x1.5x1000mm tension spring" where 0.2mm is wire thickness, 1.5mm is OD, 1000mm is length. So I ordered 1mm OD tension spring and 1.5mm OD tension spring to test and see what seems best. If the 1mm OD spring seems reliable to me, I'll go with it. Anyways, since the spring is now smaller, I can use also a smaller PTFE tubing to house the spring so I ordered uxcell PTFE Tubing 1.8mm ID x 2.2mm OD off amazon. 2.2mm OD tubing compared to 4mm tubing is SHOCKINGLY smaller when you look at them. So it will be WAY more space efficient now. Here's my updated tension spring concept drawing: 
Drop a Comment: Comments: ---------------------------------------------------------------------------- Blog Post #81, submitted 4/29/25 After further consideration, I'm scrapping using the elastic cord for a bracelet idea (as a tension spring for the winch in place pulley). The point of that was to use as little space as possible but I just don't trust it. I am not sure what material it is made of and my experience with rubber bands has always been dry rot issues. I am going with 2mm OD tension spring instead. It has to stretch 12.5" and so I'm using a 12.7" strip of it to start. That feels like a snug stretch but does comfortably reach the 12.5" of stretch needed. This brings its stretched total length to 25.2". I bought 3mm ID 4mm OD TPFE tubing to be its guidance tube for this. That arrives tomorrow and then I can begin assembly. This 4mm OD guidance tube is a bit bulky and long for the arm IMO so I will relocate it to the torso since if I use this method for other motors these 4mm OD tubes will add up in space taken up fast. The arm can't house them - it's just too much space taken at that point for these. But the torso can house them in the back or sides I think. For now, since the torso is not yet attached, I'm going to place this tube ON the string suspended from my ceiling and treat that string as though it were the torso for now. Here is the tension spring in question from the paragraphs above. I want this spring inside the tubing though which is not shown in the drawing of it. 
Drop a Comment: Comments: Older Posts |
|
|||
|
||||
| *REGISTERED NAMES AND TRADEMARKS ARE THE PROPERTY OF THEIR RESPECTIVE OWNERS. |
|
Page Hits: 53473. |